VMプールストレージの移動
VMware Workstationでもそうなのですが、仮想マシンとホストOSのシステムが、SSD上ならまだしも同じHDD上に共存していると、ディスクI/Oで仮想マシンもホストOSも動作が遅くなりがちです。そこで、作成した仮想マシンをデフォルトプールから、別のHDDへ移動させることにしました。
まず、仮想マシンが稼働していないことを確認の上、ディスクイメージファイルを移動します。尚、デフォルト以外のプールは仮想マシンマネージャにて予め用意しておきました。
|
1 2 3 4 5 6 7 8 9 10 11 |
$ virsh pool-list Name State Autostart ------------------------------------------- default active yes <-- /var/lib/libvirt/images/ 【デフォルト】 iso active yes kvm active yes <-- /str500/kvm/【引越先】 $ sudo ls -l /var/lib/libvirt/images/ -rw------- 1 root root 21478375424 Jul 5 21:55 xampp1.qcow2 $ sudo mv /var/lib/libvirt/images/xampp1.qcow2 /str500/kvm/ |
次に仮想マシン定義XMLファイルを編集して、仮想ディスクファイルのパスを修正します。
|
1 2 3 4 5 6 7 |
$ ls -la /etc/libvirt/qemu/ drwxr-xr-x 3 root root 4096 Jul 5 14:57 . drwxr-xr-x 7 root root 4096 Jul 5 11:49 .. drwxr-xr-x 3 root root 4096 Jul 5 11:01 networks -rw------- 1 root root 4160 Jul 5 14:57 xampp1.xml $ virsh edit xampp1 |
仮想ハードウェア情報が記載されたXMLファイルの <disk> エレメント内、 <source> エレメントのパスを修正します。
|
1 2 3 4 5 6 7 8 9 |
<domain type='kvm'> -略- <devices> <disk type='file' device='disk'> <driver name='qemu' type='qcow2'/> <source file='/str500/kvm/xampp1.qcow2'/> <target dev='vda' bus='virtio'/> <address type='pci' domain='0x0000' bus='0x00' slot='0x06' function='0x0'/> </disk> |
virshコマンドの基本
仮想マシンの一覧は次のようにして取得出来ますが、オプションを付与しないと稼働中の仮想マシンしか表示されないので、注意が必要です。
|
1 2 3 4 5 6 7 8 9 10 11 |
$ virsh list Id Name State ---------------------------------------------------- $ virsh list --all Id Name State ---------------------------------------------------- - xampp1 shut off $ virsh list Id Name State ---------------------------------------------------- 1 xampp1 running |
仮想マシンの起動、安全な終了、強制終了は次の要領で。
|
1 2 3 4 5 6 7 |
$ virsh start xampp1 Domain xampp1 started $ virsh shutdown xampp1 Domain xampp1 is being shutdown $ virsh destroy xampp1 |
プールリストを出力してみますが、パスが表示されません。個別にプールの詳細情報を取得するコマンドでもパスの項目は無く、プールの設定XMLファイルを直接閲覧してようやく確認。
|
1 2 3 4 5 6 7 8 9 10 11 12 13 14 15 16 17 18 19 20 21 22 23 24 25 26 27 28 29 30 31 |
$ virsh pool-list Name State Autostart ------------------------------------------- default active yes iso active yes kvm active yes $ virsh pool-info default Name: default UUID: 202bbcdb-6b3c-4c28-8cca-99e18cf004fe State: running Persistent: yes Autostart: yes Capacity: 123.81 GiB Allocation: 25.75 GiB Available: 98.06 GiB $ ls -l /etc/libvirt/storage/ drwxr-xr-x 2 root root 4096 Jul 5 14:05 autostart -rw------- 1 root root 538 Jul 5 11:14 default.xml -rw------- 1 root root 518 Jul 5 14:05 iso.xml -rw------- 1 root root 518 Jul 5 14:04 kvm.xml $ sudo cat /etc/libvirt/storage/default.xml <pool type='dir'> <name>default</name> -略- <target> <path>/var/lib/libvirt/images</path> </target> </pool> |
次に、仮想マシンに割り当てられた仮想ネットワークのIPアドレスを調べてみます。
|
1 2 3 4 5 6 7 8 9 |
$ virsh net-list Name State Autostart Persistent ---------------------------------------------------------- default active yes yes $ virsh net-dhcp-leases default Expiry Time MAC address Protocol IP address Hostname Client ID or DUID ------------------------------------------------------------------------------------------------------------------- 2021-07-12 12:20:58 52:54:00:ad:e2:c3 ipv4 192.168.122.150/24 xampp1 ff:b5:5e:67:ff:00:02:00:00:ab:11:65:8b:f6:db:4a:c5:e9:55 |
または次のコマンドなら一発です。
|
1 2 3 4 |
$ virsh domifaddr xampp1 Name MAC address Protocol Address ----------------------------------------------------------------- vnet0 52:54:00:ad:e2:c3 ipv4 192.168.122.150/24 |
virshからVMのコンソールへアクセス
virsh console コマンドを使うと仮想マシンのコンソールへアクセスすることが出来ます。今回のように自機内に仮想マシンホストを内包している場合、このコンソールを使うことでsshをネットワークに向けて開放する必要が無くなるので、セキュリティ面にも良いでしょう。
|
1 2 3 4 5 6 7 8 9 10 11 12 13 14 15 16 17 |
$ sudo systemctl start serial-getty@ttyS0 $ sudo systemctl enable serial-getty@ttyS0 Created symlink /etc/systemd/system/getty.target.wants/serial-getty@ttyS0.service → /lib/systemd/system/serial-getty@.service. $ sudo systemctl status serial-getty@ttyS0 ● serial-getty@ttyS0.service - Serial Getty on ttyS0 Loaded: loaded (/lib/systemd/system/serial-getty@.service; enabled; vendor preset: enabled) Active: active (running) since Tue 2021-07-13 01:24:37 UTC; 1min 50s ago Docs: man:agetty(8) man:systemd-getty-generator(8) http://0pointer.de/blog/projects/serial-console.html Main PID: 1116 (agetty) Tasks: 1 (limit: 2278) Memory: 216.0K CGroup: /system.slice/system-serial\x2dgetty.slice/serial-getty@ttyS0.service └─1116 /sbin/agetty -o -p -- \u --keep-baud 115200,38400,9600 ttyS0 vt220 Jul 13 01:24:37 xampp1 systemd[1]: Started Serial Getty on ttyS0. |
これで仮想マシン側の受付体制は整いました。 virsh console コマンドでホストからアクセスしてみます。
|
1 2 3 4 5 6 7 8 9 10 11 12 13 14 15 16 17 18 19 20 21 |
$ virsh console xampp1 Connected to domain xampp1 Escape character is ^] xampp1 login: user Password: Welcome to Ubuntu 20.04.2 LTS (GNU/Linux 5.4.0-77-generic x86_64) System information as of Tue 13 Jul 2021 01:28:29 AM UTC System load: 0.29 Processes: 133 Usage of /: 23.2% of 18.57GB Users logged in: 0 Memory usage: 9% IPv4 address for ens3: 192.168.122.150 Swap usage: 0% 0 updates can be applied immediately. $ $ exit logout Ubuntu 20.04.2 LTS xampp1 ttyS0 xampp1 login: |
尚、コンソールから抜け出すには、 Ctrl+] を使用します。
また仮想マシンを起動する際に、そのままコンソールへ接続することも出来ます。
|
1 2 3 4 5 6 7 8 9 10 11 12 13 14 15 16 17 |
$ virsh start xampp1 --console Domain xampp1 started Connected to domain xampp1 Escape character is ^] Ubuntu 20.04.2 LTS xampp1 ttyS0 xampp1 login: Password: Welcome to Ubuntu 20.04.2 LTS (GNU/Linux 5.4.0-77-generic x86_64) System load: 0.33 Processes: 130 Usage of /: 29.0% of 18.57GB Users logged in: 0 Memory usage: 9% IPv4 address for ens3: 192.168.122.150 Swap usage: 0% $ |
VMにXAMPP適用
それでは次に仮想マシンへXAMPPをインストールしてみます。まず、XAMPP公式サイトのダウンロードページにある、Linux向けXAMPPのPHPバージョン別インストーラのリンクをコピーします。
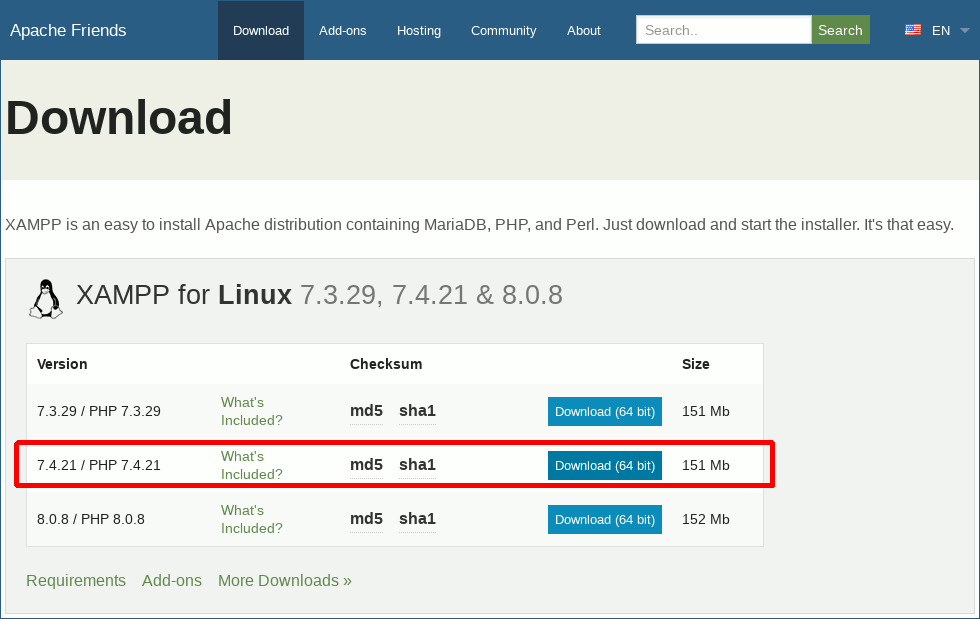
図11.XAMPP Download Installer
仮想マシン上のコンソールで、 wget を使ってこのインストーラを取得し、実行権限を付与します。尚、今回インストールするのはPHP7.4版としました。
|
1 2 3 4 5 6 7 8 9 10 11 12 13 14 15 16 17 18 19 20 21 |
$ wget https://www.apachefriends.org/xampp-files/7.4.21/xampp-linux-x64-7.4.21-0-installer.run --2021-07-13 03:46:55-- https://www.apachefriends.org/xampp-files/7.4.21/xampp-linux-x64-7.4.21-0-installer.run Resolving www.apachefriends.org (www.apachefriends.org)... 184.72.251.217, 18.211.147.142, 34.231.224.63 Connecting to www.apachefriends.org (www.apachefriends.org)|184.72.251.217|:443... connected. HTTP request sent, awaiting response... 302 Moved Temporarily Location: https://downloadsapachefriends.global.ssl.fastly.net/7.4.21/xampp-linux-x64-7.4.21-0-installer.run?from_af=true [following] --2021-07-13 03:46:56-- https://downloadsapachefriends.global.ssl.fastly.net/7.4.21/xampp-linux-x64-7.4.21-0-installer.run?from_af=true Resolving downloadsapachefriends.global.ssl.fastly.net (downloadsapachefriends.global.ssl.fastly.net)... 151.101.1.194, 151.101.65.194, 151.101.129.194, ... Connecting to downloadsapachefriends.global.ssl.fastly.net (downloadsapachefriends.global.ssl.fastly.net)|151.101.1.194|:443... connected. HTTP request sent, awaiting response... 200 OK Length: 159033430 (152M) [binary/octet-stream] Saving to: ‘xampp-linux-x64-7.4.21-0-installer.run’ xampp-linux-x64-7.4 100%[===================>] 151.67M 1.02MB/s in 3m 59s 2021-07-13 03:50:56 (648 KB/s) - ‘xampp-linux-x64-7.4.21-0-installer.run’ saved [159033430/159033430] $ ls -l -rw-rw-r-- 1 user user 159033430 Jul 9 11:00 xampp-linux-x64-7.4.21-0-installer.run $ chmod +x ./xampp-linux-x64-7.4.21-0-installer.run $ ls -l -rwxrwxr-x 1 user user 159033430 Jul 9 11:00 xampp-linux-x64-7.4.21-0-installer.run |
インストーラをroot権限で実行します。インストール中に聞かれる項目は全て「yes」や[Enter]で進みました。
|
1 2 3 4 5 6 7 8 9 10 11 12 13 14 15 16 17 18 19 20 21 22 23 24 25 26 27 28 29 30 31 32 33 34 |
user@xampp1:~$ sudo ./xampp-linux-x64-7.4.21-0-installer.run ---------------------------------------------------------------------------- Welcome to the XAMPP Setup Wizard. ---------------------------------------------------------------------------- Select the components you want to install; clear the components you do not want to install. Click Next when you are ready to continue. XAMPP Core Files : Y (Cannot be edited) XAMPP Developer Files [Y/n] :y Is the selection above correct? [Y/n]: y ---------------------------------------------------------------------------- Installation Directory XAMPP will be installed to /opt/lampp Press [Enter] to continue: ---------------------------------------------------------------------------- Setup is now ready to begin installing XAMPP on your computer. Do you want to continue? [Y/n]: y ---------------------------------------------------------------------------- Please wait while Setup installs XAMPP on your computer. Installing 0% ______________ 50% ______________ 100% ######################################### ---------------------------------------------------------------------------- Setup has finished installing XAMPP on your computer. |
インストール中はだいぶ仮想マシンに負荷が掛かりましたが、インストールが終わればもうXAMPPはスタンバイしています。操作の為のコマンド系統は以下の通りとてもシンプル。
|
1 2 3 4 5 6 7 8 9 10 11 12 13 14 15 16 17 18 19 20 21 22 23 24 25 26 |
$ /opt/lampp/xampp Usage: xampp <action> start Start XAMPP (Apache, MySQL and eventually others) startapache Start only Apache startmysql Start only MySQL startftp Start only ProFTPD stop Stop XAMPP (Apache, MySQL and eventually others) stopapache Stop only Apache stopmysql Stop only MySQL stopftp Stop only ProFTPD reload Reload XAMPP (Apache, MySQL and eventually others) reloadapache Reload only Apache reloadmysql Reload only MySQL reloadftp Reload only ProFTPD restart Stop and start XAMPP security Check XAMPP's security enablessl Enable SSL support for Apache disablessl Disable SSL support for Apache backup Make backup file of your XAMPP config, log and data files oci8 Enable the oci8 extenssion panel Starts graphical XAMPP control panel |
早速全起動させてみると、致命的ではないものの、何か足りないパッケージがありそう。
|
1 2 3 4 5 6 7 8 |
$ sudo /opt/lampp/xampp start [sudo] password for user: Starting XAMPP for Linux 7.4.21-0... XAMPP: Starting Apache...already running. XAMPP: Starting MySQL.../opt/lampp/share/xampp/xampplib: line 22: netstat: command not found ok. XAMPP: Starting ProFTPD.../opt/lampp/share/xampp/xampplib: line 22: netstat: command not found ok. |
netstat は net-tools パッケージに収められているので、これをインストールします。
|
1 2 3 4 5 6 7 8 9 10 11 12 13 14 |
$ sudo apt install net-tools Reading package lists... Done Building dependency tree Reading state information... Done The following NEW packages will be installed: net-tools Progress: [ 20%] [###########...............................................] Progress: [ 40%] [#######################...................................] Progress: [ 80%] [##############################################............] Get:1 http://hk.archive.ubuntu.com/ubuntu focal/main amd64 net-tools amd64 1.60+git20180626.aebd88e-1ubuntu1 [196 kB] Fetched 196 kB in 2s (112 kB/s) Selecting previously unselected package net-tools. Unpacking net-tools (1.60+git20180626.aebd88e-1ubuntu1) ... installed.) Setting up net-tools (1.60+git20180626.aebd88e-1ubuntu1) ...ubuntu1_amd64.deb ... |
もう一度、起動操作してみると今度は不満なく起動してくれました。コマンド凡例には記述がないものの、 xampp status でステータスを確認できました。
|
1 2 3 4 5 6 7 8 9 10 11 12 13 14 15 16 17 |
$ sudo /opt/lampp/xampp start Starting XAMPP for Linux 7.4.21-0... XAMPP: Starting Apache...ok. XAMPP: Starting MySQL...ok. XAMPP: Starting ProFTPD...ok. $ sudo /opt/lampp/xampp status Version: XAMPP for Linux 7.4.21-0 Apache is running. MySQL is running. ProFTPD is running. $ sudo /opt/lampp/xampp stop Stopping XAMPP for Linux 7.4.21-0... XAMPP: Stopping Apache...ok. XAMPP: Stopping MySQL...ok. XAMPP: Stopping ProFTPD...ok. |
ブラウザを通じて仮想マシンのIPアドレスを開いてみると、XAMPPのデフォルトページが表示されました。
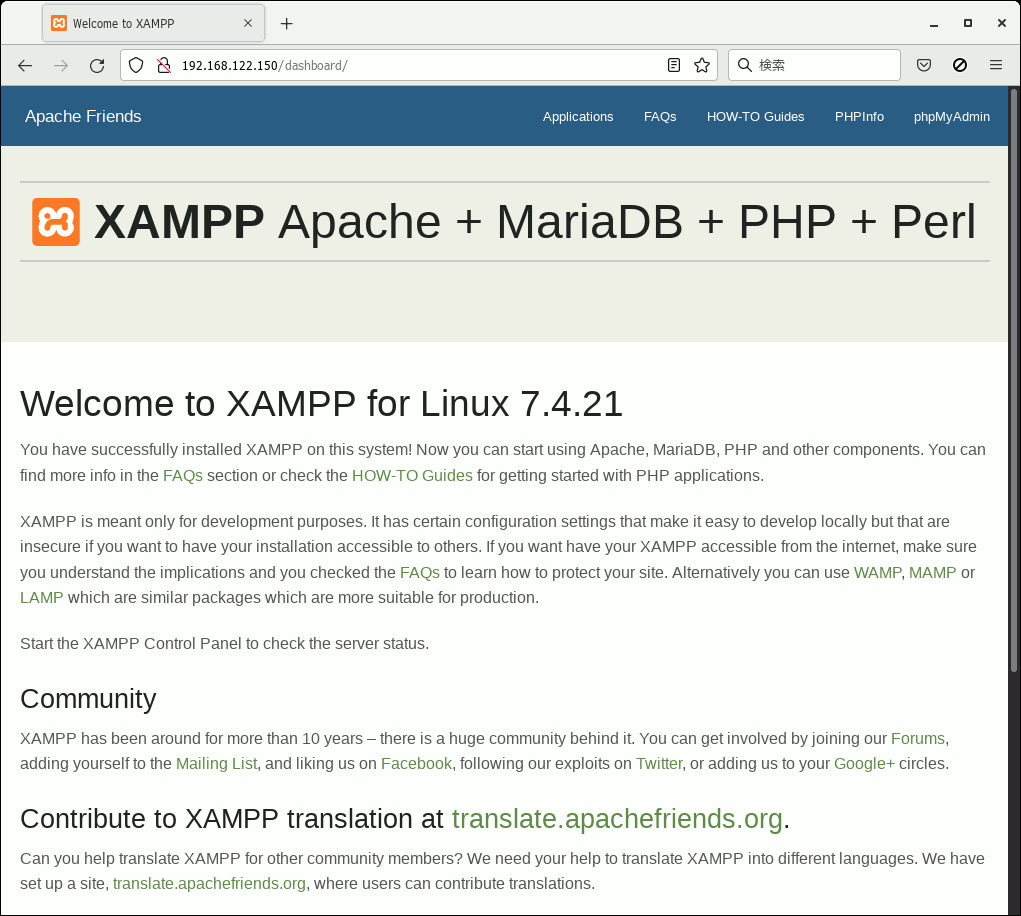
図12.XAMPP Default Home Page
これで空っぽのXAMPPサーバが手に入ったので、次回は以前設定したWordPress本番サーバのバックアップの復元検証をしてみたいと思います。
2023年11月追記 : XAMPPの自動開始
XAMPPによるこのWeb開発環境は、必要な時に仮想マシンを立ち上げる使い方を基本にしています。
仮想マシンを立ち上げてもXAMPPはコンソールからコマンドで動かす手間が面倒なので、サービスファイルを作成してsystemdによる自動起動するようにしました。
先ず、次のようなサービスファイルを特権ユーザで作成します。
|
1 2 3 4 5 6 7 8 9 10 |
[Unit] Description=XAMPP Service [Service] ExecStart=/opt/lampp/lampp start ExecStop=/opt/lampp/lampp stop Type=forking [Install] WantedBy=multi-user.target |
そして、システム開始時に自動実行されるようサービスを登録、XAMPPが問題無く動くことを確認します。
|
1 2 3 4 5 6 7 8 9 10 11 12 13 14 15 16 17 18 19 20 21 22 23 24 25 26 27 28 29 30 31 32 |
$ sudo systemctl enable xampp Created symlink /etc/systemd/system/multi-user.target.wants/xampp.service → /etc/systemd/system/xampp.service. $ systemctl status xampp ● xampp.service - XAMPP Service Loaded: loaded (/etc/systemd/system/xampp.service; enabled; vendor preset:> Active: inactive (dead) $ sudo systemctl start xampp $ systemctl status xampp ● xampp.service - XAMPP Service Loaded: loaded (/etc/systemd/system/xampp.service; enabled; vendor preset:> Active: active (running) since Thu 2023-11-30 09:45:14 HKT; 1s ago Process: 1336 ExecStart=/opt/lampp/lampp start (code=exited, status=0/SUCCE> Tasks: 40 (limit: 2256) Memory: 129.3M CGroup: /system.slice/xampp.service ├─1376 /opt/lampp/bin/httpd -k start -E /opt/lampp/logs/error_log > ├─1379 /opt/lampp/bin/httpd -k start -E /opt/lampp/logs/error_log > ├─1405 proftpd: (accepting connections) ├─1422 /opt/lampp/bin/httpd -k start -E /opt/lampp/logs/error_log > ├─1423 /opt/lampp/bin/httpd -k start -E /opt/lampp/logs/error_log > ├─1427 /opt/lampp/bin/httpd -k start -E /opt/lampp/logs/error_log > ├─1428 /opt/lampp/bin/httpd -k start -E /opt/lampp/logs/error_log > ├─1432 /opt/lampp/bin/httpd -k start -E /opt/lampp/logs/error_log > ├─1473 /bin/sh /opt/lampp/bin/mysqld_safe --datadir=/opt/lampp/var> └─1624 /opt/lampp/sbin/mysqld --basedir=/opt/lampp --datadir=/opt/> Nov 30 09:45:13 xampp1 systemd[1]: Starting XAMPP Service... Nov 30 09:45:14 xampp1 lampp[1336]: Starting XAMPP for Linux 7.4.21-0... Nov 30 09:45:14 xampp1 lampp[1336]: XAMPP: Starting Apache... Nov 30 09:45:14 xampp1 lampp[1377]: ok. Nov 30 09:45:14 xampp1 lampp[1336]: XAMPP: Starting MySQL... |
参考と鳴謝 ( GreatTnx!! )


