Raspberry Piよりも小さくミニマルながらGbE搭載のシングルボードコンピュータ、 NanoPi NEO2 に専用 OLED HATがセットのモデルを購入し、I2C接続の液晶表示やボタンGPIO制御に Node.js を初めて触ってみました。
今でこそARM系マイコン基板はRaspberry Piばかり使っていますが、黎明期には、SheevaPlugに始まり、BeagleBoardやPandaBoardに手を染めて、かなり痛い目に遭ってきました。そのような過去から、Raspberry Pi以外には手を出さない傾向にありましたが、今回その禁を破ることになります。
ハードウェアレビュー
Raspberry Pi 4はギガビットイーサ搭載していますが、お値段もそれなり。逆に現在構想中のプロジェクトにWiFiは不要なので、リーズナブルなNanoPi NEO2を採用した次第。結局、OLEDと金属ケースとのセットになった、NanoPi NEO2 Blackを計RMB299+送料で購入(汎用OLEDは安いので、ケースどうでも良ければさらにお求め易いお値段になることでしょう)。
商品開封時はもう、基板はケースにOLED共々組まれた完成状態、さらにOS入りのmicroSDまで付属しているので、これ挿してLAN繋いで電源入れればもうそれで動くし、IPアドレスなんかもOLEDに表示されちゃいます。出来上がっています!

図1.NanoPi NEO2 Black 初回起動
ひとまず電源を落とし、金属ケースを開けて気になる中身を確認。付属の六角レンチでケースを開け、NanoPi NEO2 Black基板の上に乗っかったOLED HATを外します。アルミケースはヒートシンクも兼ねていて、3連プッシュボタンはそのトップも金属製です。公式サイトを見ると付属されるmicro SDはSandisk製ですが、今回同梱されていたのは東芝製でした。
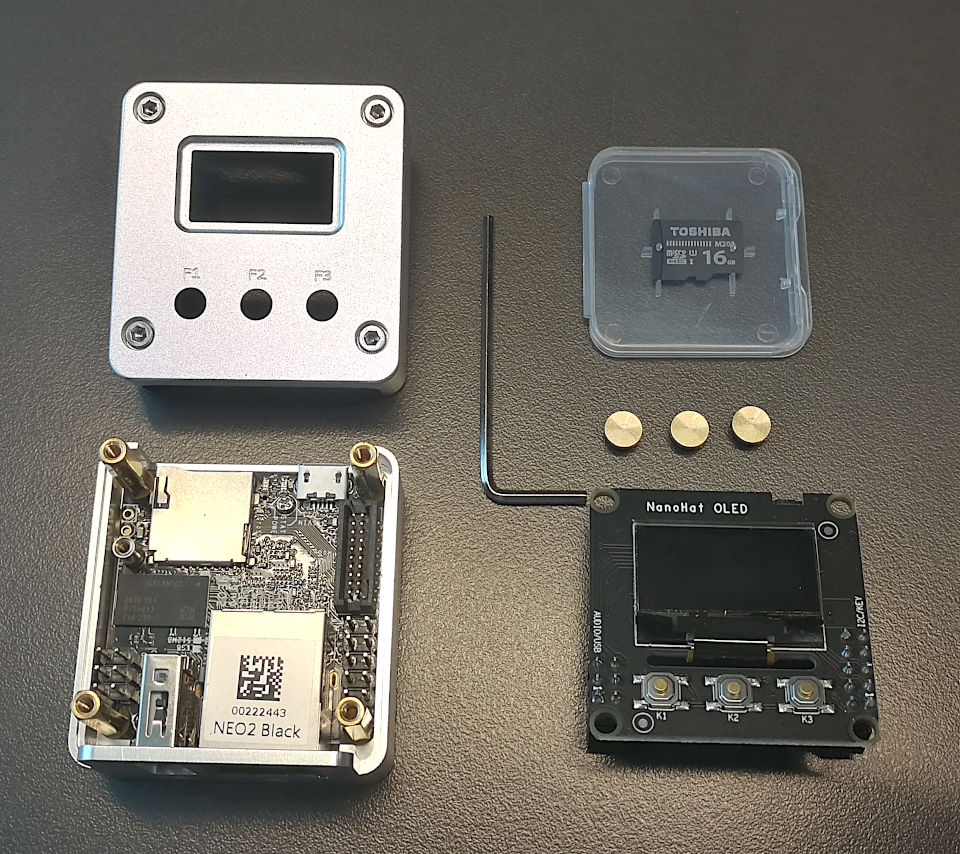
図2.NanoPi NEO2 Black 全景
NanoPi NEO2 BlackはNanoPi NEO2の単純なRAM増強版程度にしか認識していませんでしたが、基板からデザインし直しているのだそうです。CPUは裏面に実装され、熱伝導シートを介してケース底面に接する仕様になっています。実際、アイドリング運転時も底面がほんのり熱を持つ感じです。
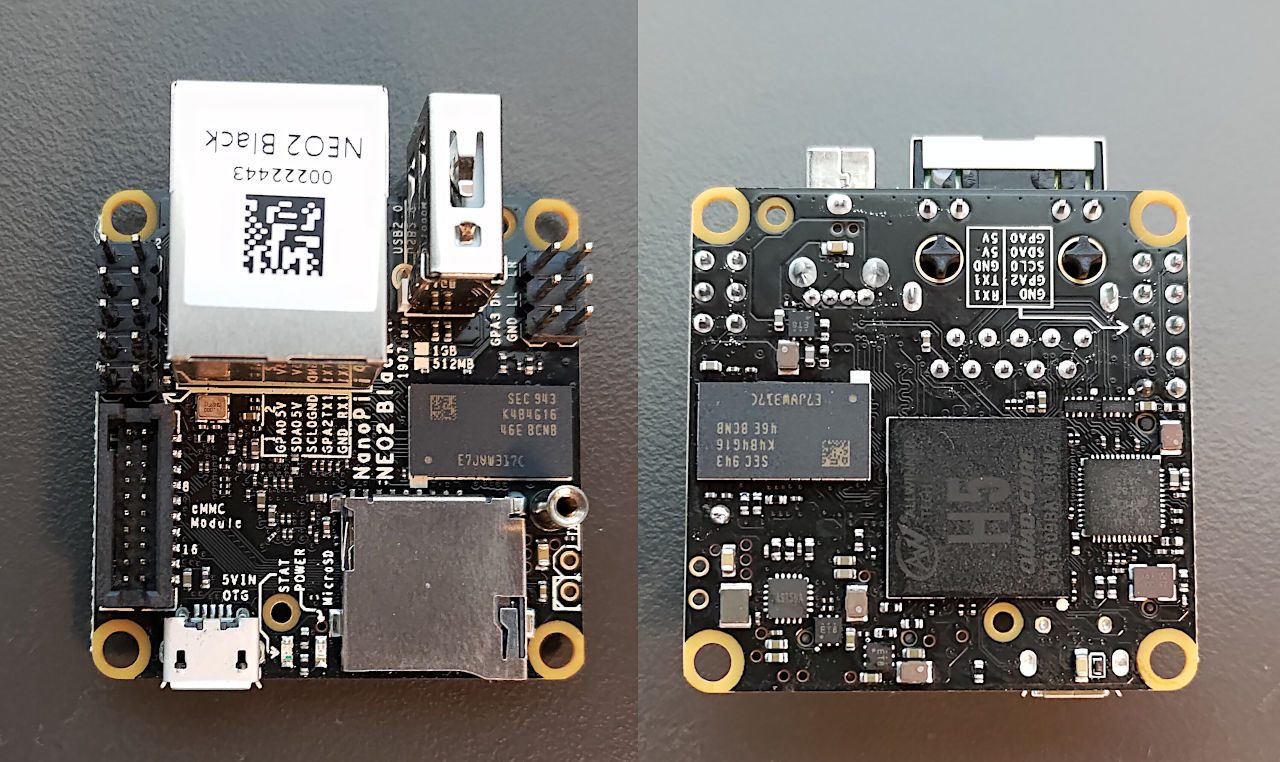
図3.NanoPi NEO2 Black 本体基板
OLED HATは0.96インチ、解像度128×64ピクセルの液晶に加え、本体からのオーディオ出力ジャックとUSBポートも側面に備えています。
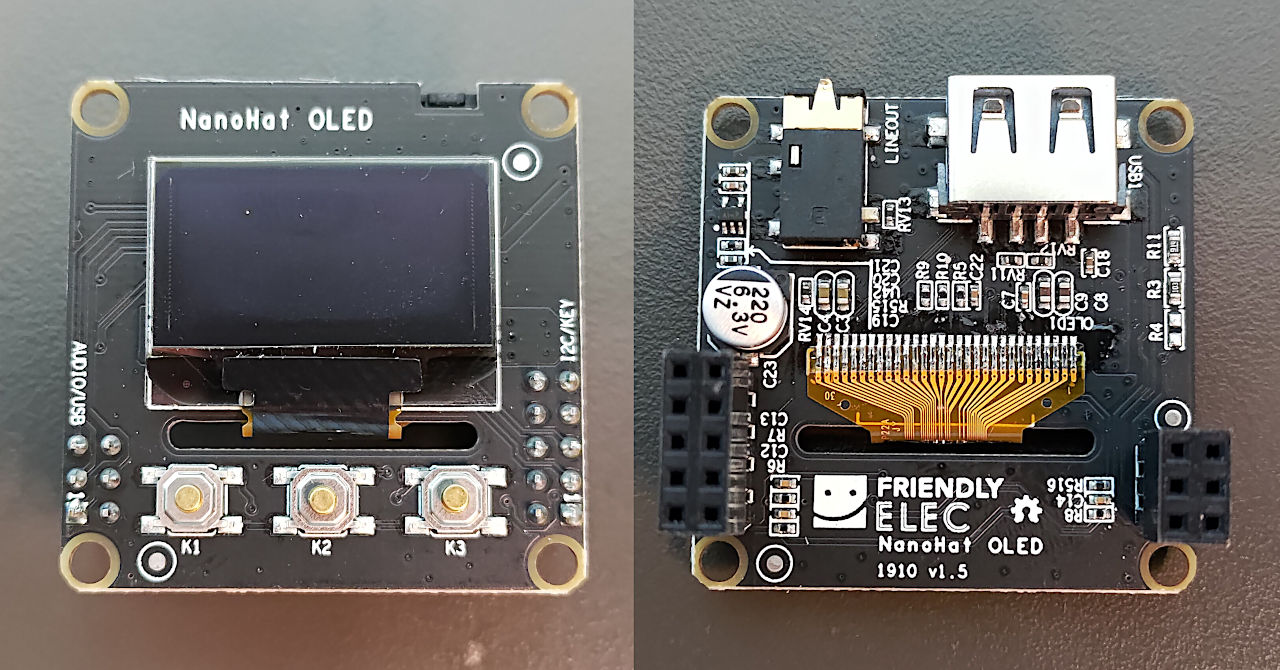
図4.NanoPi NEO2 Black OLED HAT
謹製スクリプトを無効化
まず付属SDカードに入っているOSの基本情報を確認してみます。
|
1 2 3 4 5 6 7 8 9 |
$ cat /proc/device-tree/model FriendlyElec NanoPi-NEO2-Black $ lsb_release -a No LSB modules are available. Distributor ID: Ubuntu Description: Ubuntu 16.04.6 LTS Release: 16.04 Codename: xenial |
このOLED HATが予め有効化されたOSイメージは、公式wikiページの「4 Run pre-enabled NanoHat-OLED ROM」項のリンクよりダウンロードすることが可能で、今回使っているXenialベースのROM以外に、OpenWRTベースのROMも用意されていました。
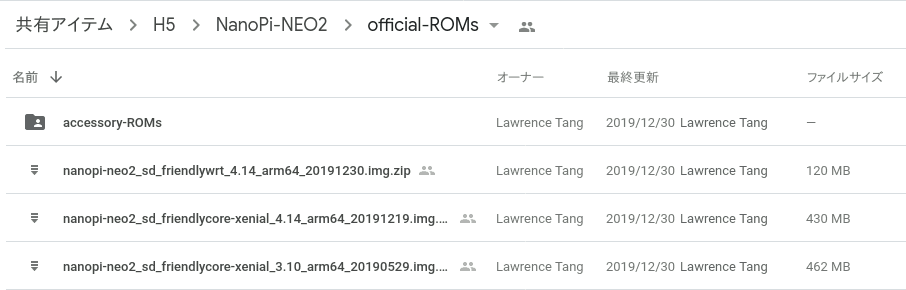
図5.OLED HAT Enabed ROM for NanoPi NEO2
購入当時はこのプレインストールされている仕組みをカスタマイズしようと思ったのですが、これが複雑な構成でディスプレイの表示を含め商品として完成されていて、カスタマイズには不向きな印象を受けました。自動起動スクリプトからその動作を追ってみると、
|
1 2 3 4 5 6 7 8 9 10 11 12 13 14 15 16 17 18 19 20 21 22 23 24 25 26 27 28 29 30 31 32 33 |
$ cat /etc/rc.local #!/bin/sh -e # # rc.local # # This script is executed at the end of each multiuser runlevel. # Make sure that the script will "exit 0" on success or any other # value on error. # # In order to enable or disable this script just change the execution # bits. # # By default this script does nothing. /usr/local/bin/gen-friendlyelec-release . /etc/friendlyelec-release if [ ! -f /etc/firstuse ]; then /bin/echo ${BOARD} > /etc/hostname /bin/sed -i "s/\(127.0.1.1\s*\).*/\1${BOARD}/g" /etc/hosts /bin/hostname ${BOARD} /bin/echo "0" > /etc/firstuse fi if [ -e /usr/bin/setqtenv ]; then . /usr/bin/setqtenv /usr/bin/lcd2usb_print "CPU: {{CPU}}" "Mem: {{MEM}}" "IP: {{IP}}" "LoadAvg: {{LOADAVG}}" 2>&1 > /dev/null& #/opt/QtE-Demo/run.sh& fi /usr/local/bin/oled-start exit 0 |
下端にある「oled-start」は何をしているのかと言うと、
|
1 2 3 4 |
$ cat /usr/local/bin/oled-start #!/bin/sh cd /root/NanoHatOLED ./NanoHatOLED |
この「NanoHatOLED」と言うバイナリのソースはGitHubに公開されていて、プログラムは常駐してGPIOボタンを監視し、その状態を別のPythonスクリプトのプロセスに渡していることが読み取れます。
|
1 2 3 4 5 6 7 8 9 10 11 12 13 14 |
-中略- const char* python_file = "bakebit_nanohat_oled.py"; -中略- int load_python_view() { int ret; char* cmd = (char*)malloc(255); sprintf(cmd, "cd %s/BakeBit/Software/Python && python %s 2>&1 | tee /tmp/nanoled-python.log", workpath, python_file); ret = pthread_create(&view_thread_id, NULL, (void*)threadfunc,cmd); if(ret) { log2file("create pthread error \n"); return 1; } return 0; } |
渡し先であるPythonスクリプト「bakebit_nanohat_oled.py」は、Bakebit Starter Kitのライブラリの一部で、これもGitHubで公開されています。

|
1 2 3 4 5 6 7 8 9 10 11 12 13 14 15 16 17 18 19 20 21 22 23 24 25 26 27 28 29 30 31 32 33 34 |
$ ls -l /root/Python/BakeBit/Software/Python/ -rw-r--r-- 1 root root 14197 Oct 18 2019 bakebit_128_32_oled.py -rw-r--r-- 1 root root 2102 Oct 18 2019 bakebit_128_32_oled_test.py -rw-r--r-- 1 root root 4249 Oct 18 2019 bakebit_128_64_oled_animate.py -rw-r--r-- 1 root root 2004 Oct 18 2019 bakebit_128_64_oled_image.py -rw-r--r-- 1 root root 14200 Oct 18 2019 bakebit_128_64_oled.py -rw-r--r-- 1 root root 3355 Oct 18 2019 bakebit_128_64_oled_shapes.py -rw-r--r-- 1 root root 2170 Oct 18 2019 bakebit_128_64_oled_test.py -rw-r--r-- 1 root root 1824 Oct 18 2019 bakebit_button.py -rw-r--r-- 1 root root 1617 Oct 18 2019 bakebit_buzzer.py -rw-r--r-- 1 root root 2959 Oct 18 2019 bakebit_ledbar.py -rw-r--r-- 1 root root 2563 Oct 18 2019 bakebit_led_blink.py -rw-r--r-- 1 root root 2350 Oct 18 2019 bakebit_led_fade.py -rw-r--r-- 1 root root 2647 Oct 18 2019 bakebit_light_sensor.py -rw-r--r-- 1 root root 9170 Oct 18 2019 bakebit_nanohat_oled.py -rw-r--r-- 1 root root 2478 Oct 18 2019 bakebit_prj_Button_And_Buzzer.py -rw-r--r-- 1 root root 3906 Oct 18 2019 bakebit_prj_LEDBar_And_RotaryAngleSensor.py -rw-r--r-- 1 root root 2651 Oct 18 2019 bakebit_prj_Servo_And_RotaryAngleSensor.py -rw-r--r-- 1 root root 3718 Oct 18 2019 bakebit_prj_SmartLighting.py -rw-r--r-- 1 root root 3292 Oct 18 2019 bakebit_prj_SystemInfo.py -rw-r--r-- 1 root root 4215 Oct 18 2019 bakebit_prj_UIControl_via_Joystick.py -rw-r--r-- 1 root root 2399 Oct 18 2019 bakebit_prj_Ultrasonic_Sensor_with_LED.py -rwxr-xr-x 1 root root 17718 Oct 18 2019 bakebit.py -rw-r--r-- 1 root root 2849 Oct 18 2019 bakebit_rotary_angle_sensor.py -rw-r--r-- 1 root root 1852 Oct 18 2019 bakebit_servo.py -rw-r--r-- 1 root root 2272 Oct 18 2019 bakebit_sound_sensor.py -rw-r--r-- 1 root root 2128 Oct 18 2019 bakebit_thumb_joystick.py -rw-r--r-- 1 root root 1907 Oct 18 2019 bakebit_ultrasonic.py -rw-r--r-- 1 root root 36 Oct 18 2019 change_log.txt -rw-r--r-- 1 root root 229460 Oct 18 2019 DejaVuSansMono-Bold.ttf -rw-r--r-- 1 root root 237788 Oct 18 2019 DejaVuSansMono.ttf -rw-r--r-- 1 root root 3995 Oct 18 2019 friendllyelec.png -rwxr-xr-x 1 root root 1386 Oct 18 2019 README.md -rwxr-xr-x 1 root root 1838 Oct 18 2019 setup.py |
こうして、複数の言語に跨って成立しているシステムであることは分かったので、これをカスタマイズすることは諦め、rc.localが起動しないようにコメントアウトしました。尚、とにかく数が少ないカスタマイズ例の中、本項ではこちらの記事がとても参考になりました(感謝)。

Node.jsインストール
あまりにも複雑で難易度の高い、謹製スクリプトによるOLED制御システムに代わる手法として、良さそうだったのがNode.jsでした。実際にmpd機器のディスプレイとして高い完成度に仕上げている方の例を見つけ、Web開発で自分にとっても馴染み深い、JavaScriptの実行環境であるNode.jsを初めて触ってみることにします。
インストールの手順は、Raspberry Piの例ですが、こちらの記事を参考にさせて頂きました。

curlが入っていないのでaptよりインストールします。
|
1 2 3 4 5 6 7 8 9 10 11 12 13 14 15 16 17 |
$ sudo apt install curl Reading package lists... Done Building dependency tree Reading state information... Done The following NEW packages will be installed: curl 0 upgraded, 1 newly installed, 0 to remove and 0 not upgraded. Need to get 133 kB of archives. After this operation, 332 kB of additional disk space will be used. Get:1 http://ports.ubuntu.com/ubuntu-ports xenial-updates/main arm64 curl arm64 7.47.0-1ubuntu2.15 [133 kB] Fetched 133 kB in 1s (93.6 kB/s) debconf: delaying package configuration, since apt-utils is not installed Selecting previously unselected package curl. (Reading database ... 45871 files and directories currently installed.) Preparing to unpack .../curl_7.47.0-1ubuntu2.15_arm64.deb ... Unpacking curl (7.47.0-1ubuntu2.15) ... Setting up curl (7.47.0-1ubuntu2.15) ... |
curlを使い、公式サイトよりレポジトリをセットアップする為のスクリプトを取得し、そのまま管理者権限で実行します。尚、Node.js ver.14系をインストールすることにしました。
|
1 2 3 4 5 6 7 8 9 10 11 12 13 14 15 16 17 18 19 20 21 22 23 24 25 26 27 28 29 30 31 32 33 34 35 36 37 38 39 40 41 42 43 44 45 46 47 48 |
$ curl -sL https://deb.nodesource.com/setup_14.x | sudo bash - ## Installing the NodeSource Node.js 14.x repo... ## Populating apt-get cache... + apt-get update Hit:1 http://ports.ubuntu.com/ubuntu-ports xenial InRelease Get:2 http://ports.ubuntu.com/ubuntu-ports xenial-updates InRelease [109 kB] Ign:3 https://ookla.bintray.com/debian xenial InRelease Get:4 http://ports.ubuntu.com/ubuntu-ports xenial-backports InRelease [107 kB] Get:5 https://ookla.bintray.com/debian xenial Release [4,387 B] Hit:5 https://ookla.bintray.com/debian xenial Release Get:6 http://ports.ubuntu.com/ubuntu-ports xenial-security InRelease [109 kB] Fetched 325 kB in 2s (119 kB/s) Reading package lists... Done ## Confirming "xenial" is supported... + curl -sLf -o /dev/null 'https://deb.nodesource.com/node_14.x/dists/xenial/Release' ## Adding the NodeSource signing key to your keyring... + curl -s https://deb.nodesource.com/gpgkey/nodesource.gpg.key | apt-key add - OK ## Creating apt sources list file for the NodeSource Node.js 14.x repo... + echo 'deb https://deb.nodesource.com/node_14.x xenial main' > /etc/apt/sources.list.d/nodesource.list + echo 'deb-src https://deb.nodesource.com/node_14.x xenial main' >> /etc/apt/sources.list.d/nodesource.list ## Running `apt-get update` for you... + apt-get update Hit:1 http://ports.ubuntu.com/ubuntu-ports xenial InRelease Hit:2 http://ports.ubuntu.com/ubuntu-ports xenial-updates InRelease Hit:3 http://ports.ubuntu.com/ubuntu-ports xenial-backports InRelease Hit:4 http://ports.ubuntu.com/ubuntu-ports xenial-security InRelease Get:5 https://deb.nodesource.com/node_14.x xenial InRelease [4,584 B] Ign:6 https://ookla.bintray.com/debian xenial InRelease Get:7 https://ookla.bintray.com/debian xenial Release [4,387 B] Hit:7 https://ookla.bintray.com/debian xenial Release Get:9 https://deb.nodesource.com/node_14.x xenial/main arm64 Packages [764 B] Get:10 https://deb.nodesource.com/node_14.x xenial/main armhf Packages [776 B] Fetched 6,124 B in 4s (1,526 B/s) Reading package lists... Done ## Run `sudo apt-get install -y nodejs` to install Node.js 14.x and npm ## You may also need development tools to build native addons: sudo apt-get install gcc g++ make ## To install the Yarn package manager, run: curl -sL https://dl.yarnpkg.com/debian/pubkey.gpg | sudo apt-key add - echo "deb https://dl.yarnpkg.com/debian/ stable main" | sudo tee /etc/apt/sources.list.d/yarn.list sudo apt-get update && sudo apt-get install yarn |
レポジトリの準備が整ったので、aptでNode.jsをインストールします。
|
1 2 3 4 5 6 7 8 9 10 11 12 13 14 15 16 17 18 19 20 21 22 |
$ sudo apt install -y nodejs Reading package lists... Done Building dependency tree Reading state information... Done The following NEW packages will be installed: nodejs 0 upgraded, 1 newly installed, 0 to remove and 0 not upgraded. Need to get 24.1 MB of archives. After this operation, 118 MB of additional disk space will be used. Get:1 https://deb.nodesource.com/node_14.x xenial/main arm64 nodejs arm64 14.7.0-1nodesource1 [24.1 MB] Fetched 24.1 MB in 5s (4,695 kB/s) debconf: delaying package configuration, since apt-utils is not installed Selecting previously unselected package nodejs. (Reading database ... 45878 files and directories currently installed.) Preparing to unpack .../nodejs_14.7.0-1nodesource1_arm64.deb ... Unpacking nodejs (14.7.0-1nodesource1) ... Setting up nodejs (14.7.0-1nodesource1) ... $ nodejs -v v14.7.0 $ npm -v 6.14.7 |
ここからいくつか、基本的な命題についてNode.jsでの実現方法を考えてみます。
Node.js: IPアドレスを取得
標準のosモジュールに用意されているos.networkInterfaces()メソッドを使うと、ネットワークインターフェイスに関する情報を得ることが出来ます。
|
1 2 3 4 5 6 7 8 9 10 11 12 13 14 15 16 17 18 19 20 21 22 23 24 25 26 27 28 29 30 31 32 33 34 35 36 37 38 39 40 41 42 43 |
var os = require('os'); var networkInterfaces = os.networkInterfaces(); console.log( networkInterfaces ); { lo: [ { address: '127.0.0.1', netmask: '255.0.0.0', family: 'IPv4', mac: '00:00:00:00:00:00', internal: true, cidr: '127.0.0.1/8' }, { address: '::1', netmask: 'ffff:ffff:ffff:ffff:ffff:ffff:ffff:ffff', family: 'IPv6', mac: '00:00:00:00:00:00', internal: true, cidr: '::1/128', scopeid: 0 } ], eth0: [ { address: '192.168.26.193', netmask: '255.255.255.0', family: 'IPv4', mac: '02:01:3e:##:##:##', internal: false, cidr: '192.168.26.193/24' }, { address: 'fe80::aae4:5b03:83ed:2797', netmask: 'ffff:ffff:ffff:ffff::', family: 'IPv6', mac: '02:01:3e:##:##:##', internal: false, cidr: 'fe80::aae4:5b03:83ed:2797/64', scopeid: 5 } ] } |
ここからLANのIPアドレスを得るには、eth0の中の0番目(IPv4)にあるaddress項の値を指定すれば良いことになります。
|
1 2 |
console.log(networkInterfaces.eth0[0].address) 192.168.26.193 |
Node.js: 任意のシェルコマンドを実行
任意のシェルコマンドを実行したいという場面は多いはずです。これには標準モジュールの一つであるchild_processモジュールのexecメソッド、execSyncメソッドが用意されていて、前者は非同期、後者は同期動作します。
|
1 2 3 4 5 6 7 8 9 10 11 12 13 14 15 16 17 18 19 20 21 22 23 24 25 26 |
> const execSync = require('child_process').execSync; undefined > const res = execSync('ls -l /').toString(); undefined > console.log(res) total 104 drwxr-xr-x 1 root root 4096 Feb 2 11:22 bin drwxr-xr-x 4 root root 16384 Jan 1 1970 boot drwxr-xr-x 15 root root 3800 Feb 12 2016 dev drwxr-xr-x 1 root root 4096 Mar 2 10:29 etc drwxr-xr-x 1 root root 4096 Mar 28 2017 home drwxr-xr-x 1 root root 4096 Jul 30 2020 lib drwx------ 2 root root 4096 Jan 1 1970 lost+found drwxr-xr-x 2 root root 4096 Oct 21 2015 media drwxr-xr-x 1 root root 4096 Feb 12 2016 mnt 図5.OLED HAT Enabed ROM for NanoPi NEO2drwxr-xr-x 3 root root 4096 Oct 18 2019 opt dr-xr-xr-x 118 root root 0 Jan 1 1970 proc drwxr-xr-x 1 root root 4096 Jul 30 2020 root drwxr-xr-x 17 root root 520 Mar 10 09:22 run drwxr-xr-x 1 root root 4096 Nov 27 17:27 sbin drwxr-xr-x 2 root root 4096 Oct 21 2015 srv dr-xr-xr-x 12 root root 0 Jan 1 1970 sys drwxrwxrwt 1 root root 4096 Mar 10 10:45 tmp drwxr-xr-x 1 root root 4096 Oct 16 2017 usr drwxr-xr-x 1 root root 4096 Jun 21 2016 var undefined |
execSyncの戻り値はバッファなので、結果の戻り値が必要な場合は、toString()で処理する必要があります。
Node.js: GPIOボタン状態監視
ここからNode.jsっぽい命題です。NanoPi NEO2 Black OLED HATには、3つの物理ボタンが実装されていて、
|
1 |
gpio0=SIGUSR1, gpio2=SIGUSR2, gpio3=SIGALRM |
とあるように各GPIOへ割り当てられています。これらのボタンの状態、押し下げイベントを取得するには、外部ライブラリのonoffを導入して使うのが便利です。外部ライブラリのインストールは、Node.jsのパッケージマネージャであるnpmを使えば良いのでとても簡単。
|
1 2 3 |
$ npm install onoff added 3 packages, and audited 10 packages in 16s found 0 vulnerabilities |
onoffライブラリではGPIOの入出力どちらもサポートされていますが、ボタン機能で必要なのは入力情報です。基本的な構成は以下の通りで、オブジェクトを作り、ウォッチします。そしてプログラム終了時にGPIOを開放する処理を最後に必ず記述するのは、どの言語でも一緒ですね。
|
1 2 3 4 5 6 7 8 9 10 11 12 |
var Gpio = require('onoff').Gpio, btn0 = new Gpio(0, 'in', 'both'); btn0.watch(function (err, value) { if (err) {throw err} if (value) {console.log ('ON')} else {console.log ('OFF')} }) process.on('SIGINT', function () { btn0.unexport(); console.log('EXIT'); }) |
ボタン3つある場合はどうするのか、単純に3つ並べてみます。
|
1 2 3 4 5 6 7 8 9 10 11 12 13 14 15 16 17 18 19 20 21 22 23 24 |
var Gpio = require('onoff').Gpio, btn0 = new Gpio(0, 'in', 'both'), btn2 = new Gpio(2, 'in', 'both'), btn3 = new Gpio(3, 'in', 'both'); btn0.watch(function (err, value) { if (err) {throw err} if (value) {console.log ('0:ON')} else {console.log ('0:OFF')} }) btn2.watch(function (err, value) { if (err) {throw err} if (value) {console.log ('2:ON')} else {console.log ('2:OFF')} }) btn3.watch(function (err, value) { if (err) {throw err} if (value) {console.log ('3:ON')} else {console.log ('3:OFF')} }) process.on('SIGINT', function () { btn0.unexport(); btn2.unexport(); btn3.unexport(); console.log('EXIT'); }) |
これで難なく動いてしまいました。
|
1 2 3 4 5 6 7 8 9 10 11 12 13 14 |
$ sudo node buttons.js *** 0:ON *** *** 0:OFF *** *** 2:ON *** *** 2:OFF *** *** 3:ON *** *** 3:OFF *** *** 3:ON *** *** 3:OFF *** *** 2:ON *** *** 2:OFF *** *** 0:ON *** *** 0:OFF *** *** end *** |
GPIOを扱うので、root権限で実行する必要があります。
Node.js: OLEDの制御
簡単な命題で肩慣らしも済んだので、ようやく今回の本題に取り掛かりましょう。今回のOLED HATのように、I2C接続されたSSD1306互換液晶の操作には、oled-i2c-bus外部ライブラリを活用します。導入はnpmで簡単なのですが、執筆中にnpm自身のメジャーアップデートがあったようで、その通知が出てしまいました。併せてアップデートします。
|
1 2 3 4 5 6 7 8 9 10 11 12 13 14 15 16 17 18 19 20 21 22 23 |
$ npm install oled-i2c-bus npm WARN saveError ENOENT: no such file or directory, open '/home/pi/package.json' npm notice created a lockfile as package-lock.json. You should commit this file. npm WARN enoent ENOENT: no such file or directory, open '/home/pi/package.json' npm WARN pi No description npm WARN pi No repository field. npm WARN pi No README data npm WARN pi No license field. + oled-i2c-bus@1.0.12 added 1 package and audited 3 packages in 3.377s found 0 vulnerabilities │ │ │ New major version of npm available! 6.14.10 → 7.6.0 │ │ Changelog: https://github.com/npm/cli/releases/tag/v7.6.0 │ │ Run npm install -g npm to update! │ │ │ $ sudo npm install -g npm /usr/bin/npm -> /usr/lib/node_modules/npm/bin/npm-cli.js /usr/bin/npx -> /usr/lib/node_modules/npm/bin/npx-cli.js + npm@7.6.1 added 59 packages from 24 contributors, removed 241 packages and updated 194 packages in 187.644s |
続いてOLED HATのI2C接続情報を確認します。OLED HATはI2Cバス番号0にアドレス0x3cで見付けることが出来ました。
|
1 2 3 4 5 6 7 8 9 10 11 12 13 14 15 16 17 18 19 20 21 22 23 24 25 26 |
$ sudo i2cdetect -l | sort i2c-0 i2c mv64xxx_i2c adapter I2C adapter i2c-1 i2c mv64xxx_i2c adapter I2C adapter i2c-2 i2c mv64xxx_i2c adapter I2C adapter i2c-3 i2c DesignWare HDMI I2C adapter i2c-4 i2c mv64xxx_i2c adapter I2C adapter $ sudo i2cdetect -y 1 0 1 2 3 4 5 6 7 8 9 a b c d e f 00: -- -- -- -- -- -- -- -- -- -- -- -- -- 10: -- -- -- -- -- -- -- -- -- -- -- -- -- -- -- -- 20: -- -- -- -- -- -- -- -- -- -- -- -- -- -- -- -- 30: -- -- -- -- -- -- -- -- -- -- -- -- -- -- -- -- 40: -- -- -- -- -- -- -- -- -- -- -- -- -- -- -- -- 50: -- -- -- -- -- -- -- -- -- -- -- -- -- -- -- -- 60: -- -- -- -- -- -- -- -- -- -- -- -- -- -- -- -- 70: -- -- -- -- -- -- -- -- $ sudo i2cdetect -y 0 0 1 2 3 4 5 6 7 8 9 a b c d e f 00: -- -- -- -- -- -- -- -- -- -- -- -- -- 10: -- -- -- -- -- -- -- -- -- -- -- -- -- -- -- -- 20: -- -- -- -- -- -- -- -- -- -- -- -- -- -- -- -- 30: -- -- -- -- -- -- -- -- -- -- -- -- 3c -- -- -- 40: -- -- -- -- -- -- -- -- -- -- -- -- -- -- -- -- 50: -- -- -- -- -- -- -- -- -- -- -- -- -- -- -- -- 60: -- -- -- -- -- -- -- -- -- -- -- -- -- -- -- -- 70: -- -- -- -- -- -- -- -- |
oled-i2c-busライブラリをインストールすると、そのサブディレクトリ内に簡単なサンプルプログラムがあるので、それらを触りながら使い方を習得することが出来ます。
|
1 2 3 4 5 6 7 8 9 10 11 |
$ tree ./node_modules/oled-i2c-bus ./node_modules/oled-i2c-bus ├── examples │ ├── clock.js │ ├── package.json │ ├── README.md │ ├── rgba.js │ └── test.png ├── oled.js ├── package.json └── README.md |
文字を表示させるには、フォントライブラリのインストールが必要です。インストールしたライブラリが増えてきましたが、「npm ls」でツリー状に一覧表示させて確認することが出来ます。
|
1 2 3 4 5 6 7 8 9 10 11 12 13 14 15 16 17 18 19 20 |
$ npm install oled-font-5x7 + oled-font-5x7@1.0.3 added 1 package from 1 contributor and audited 10 packages in 4.211s found 0 vulnerabilities $ npm ls /home/pi ├─┬ i2c-bus@5.2.1 │ ├─┬ bindings@1.5.0 │ │ └── file-uri-to-path@1.0.0 │ └── nan@2.14.2 ├── oled-font-5x7@1.0.3 ├── oled-i2c-bus@1.0.12 ├─┬ onoff@6.0.1 │ ├─┬ epoll@4.0.0 │ │ ├── bindings@1.5.0 deduped │ │ └── nan@2.14.2 deduped │ └── lodash.debounce@4.0.8 └─┬ sleep@6.3.0 └── nan@2.14.2 deduped |
基本的には次のような流れでコーディングすれば良さそうです。終了処理をシビアにコントロールしなくても良さそう(!?)。
|
1 2 3 4 5 6 7 8 9 10 11 12 13 14 15 16 17 18 19 20 21 22 23 24 25 |
var i2c = require('i2c-bus'), i2cBus = i2c.openSync(0), oled = require('oled-i2c-bus'); var opts = { width: 128, height: 64, address: 0x3C }; try { var oled = new oled(i2cBus, opts); oled.clearDisplay(); oled.turnOnDisplay(); oled.drawLine(1, 1, 128, 32, 1); } catch(err) { console.log(err.message); process.exit(1); } var font = require('oled-font-5x7'); oled.setCursor(1, 32+1); oled.writeString(font, 1, 'OLED HAT', 1, true); |
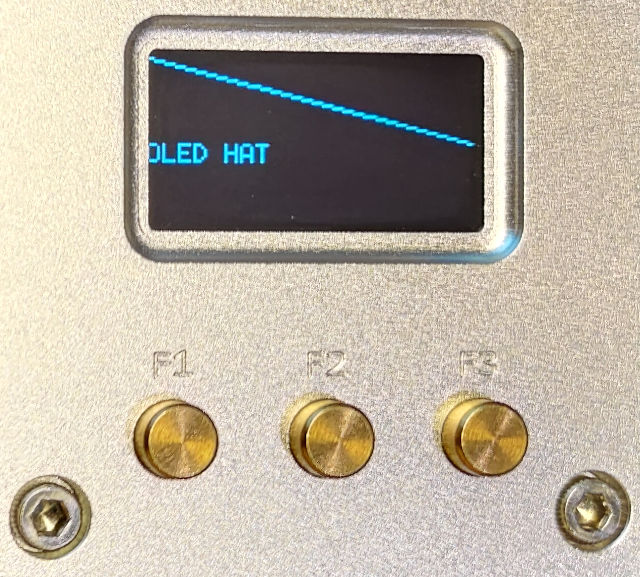
図6.Node.js oled-i2c-bus表示テスト
最後に集大成として、IPアドレスを取得しOLED HATに表示させたり、ボタン押すとシャットダウンするプログラムを組んでみました。IPアドレスを定期的に取得してOLEDへ出力するのですが、ディスプレイの一部分を消去する類の操作が見当たらなかったので、一行分を空白上書きしてから、新しい文字列を上書きするようにしています。
|
1 2 3 4 5 6 7 8 9 10 11 12 13 14 15 16 17 18 19 20 21 22 23 24 25 26 27 28 29 30 31 32 33 34 35 36 37 38 39 40 41 42 43 44 45 46 47 48 49 50 51 52 53 54 55 56 57 58 59 60 61 62 63 64 65 66 67 68 69 70 71 72 73 |
var execSync = require('child_process').execSync; var os = require('os'); var Gpio = require('onoff').Gpio, btn0 = new Gpio(0, 'in', 'both'), btn2 = new Gpio(2, 'in', 'both'), btn3 = new Gpio(3, 'in', 'both'); var font = require('oled-font-5x7'); var i2c = require('i2c-bus'), i2cBus = i2c.openSync(0), oled = require('oled-i2c-bus'); var opts = { width: 128, height: 64, address: 0x3C }; // OLED INIT try { var oled = new oled(i2cBus, opts); oled.clearDisplay(); oled.turnOnDisplay(); } catch(err) { console.log('OLED HAT Err, Not Available'); console.log(err.message); }; // SHOW LAN IP REPEATEDLY var printlanip = function () { var networkInterfaces = os.networkInterfaces(); //ERASE LINE AND PRINT oled.setCursor(1, 1); oled.writeString(font, 1, ' ', 1, false); oled.setCursor(1, 1); oled.writeString(font, 1, 'LAN '+networkInterfaces.eth0[0].address, 1, false); } var timer = setInterval(printlanip, 2000); setTimeout(printlanip, 0); // LEFT BUTTON btn0.watch(function (err, value) { if (err) {throw err} if (value) {console.log ('*** 0:ON ***')} else {console.log ('*** 0:OFF ***')} }) // MID BUTTON btn2.watch(function (err, value) { if (err) {throw err} if (value) {console.log ('*** 2:ON ***')} else {console.log ('*** 2:OFF ***')} }) // RIGHT BUTTON FOR SHUTDOWN btn3.watch(function (err, value) { if (err) {throw err} if (value) { console.log ('*** 3:ON ***') btn0.unexport(); btn2.unexport(); btn3.unexport(); oled.turnOffDisplay(); var res = "" + execSync('shutdown -h now'); console.log (res); } else {console.log ('*** 3:OFF ***')} }) // CTL+C INTERRUPT process.on('SIGINT', function () { btn0.unexport(); btn2.unexport(); btn3.unexport(); oled.turnOffDisplay(); console.log('*** end ***'); }) |
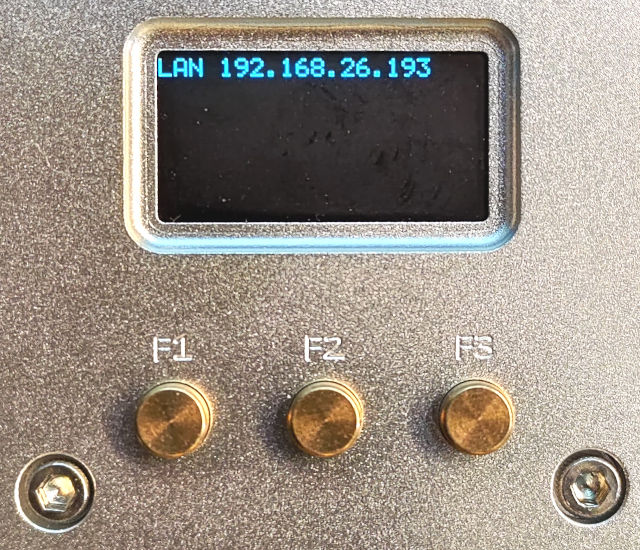
図7.Node.js IPアドレス表示
尚、Node.jsらしいasync functionを活かした実際のアプリの組み方は、こちらの記事を参考にさせて頂きました(Great Tnx!!)。

次回は本プロジェクトの最終目標である、NanoPi NEO2 Black + OLED HATとNode.jsを使ったインターネットスピードテスタの実現へ向け、Node.jsプログラムの自動起動を実装したいと思います。
Hi Jack Ryan,
I am interested in buying the NanoPi NEO2 Black and NanoHAT from you.
If you are interested in selling it to me please let me know.
Kind Regards,
Maxim
Hello,
You can find it at Aliexpress,
https://www.aliexpress.com/item/32892638248.html?spm=a2g0o.productlist.main.39.61d5ktOJktOJHf&algo_pvid=7f049884-c988-4144-9c64-3431391c92a5&algo_exp_id=7f049884-c988-4144-9c64-3431391c92a5-19&pdp_ext_f=%7B%22sku_id%22%3A%2265679679720%22%7D&pdp_npi=2%40dis%21HKD%21241.61%21241.61%21%21%21%21%21%40211bf04a16741064121182292d0764%2165679679720%21sea&curPageLogUid=xzgHP284afiv
Enjoy!