VMware vCenterにより構成される ESXi ホスト上にあるLinuxベースの仮想マシンを、ローカルUbuntu内のQEMU / KVM へ変換インポートするのに virt-v2v を使ってみたのですが、Debianベースの仮想マシンは扱えないエラーに遭遇します。
virt-v2vの導入
VMware ESXiからQEMU/KVMへのマイグレーションは、libguestfs-toolsパッケージに含まれる、 virt-v2v を使って行なうので、まずはインストール。
|
1 2 3 4 5 6 7 8 9 10 11 12 13 14 15 16 17 18 19 20 21 22 23 24 25 26 27 28 29 30 31 32 33 |
$ uname -a Linux WS-0300u 4.15.0-52-generic #56-Ubuntu SMP Tue Jun 4 22:49:08 UTC 2019 x86_64 x86_64 x86_64 GNU/Linux $ lsb_release -a No LSB modules are available. Distributor ID: Ubuntu Description: Ubuntu 18.04.6 LTS Release: 18.04 Codename: bionic $ sudo apt install libguestfs-tools パッケージリストを読み込んでいます... 完了 依存関係ツリーを作成しています 状態情報を読み取っています... 完了 以下の追加パッケージがインストールされます: btrfs-progs db-util db5.3-util extlinux hfsplus ldmtool libafflib0v5 libconfig9 libdate-manip-perl libewf2 libguestfs-hfsplus libguestfs-perl libguestfs-reiserfs libguestfs-xfs libguestfs0 libhfsp0 libhivex0 libintl-perl libintl-xs-perl libldm-1.0-0 libstring-shellquote-perl libsys-virt-perl libtsk13 libwin-hivex-perl libxml-xpath-perl lsscsi mdadm reiserfsprogs scrub sgabios sleuthkit supermin xfsprogs zerofree 提案パッケージ: duperemove libguestfs-gfs2 libguestfs-jfs libguestfs-nilfs libguestfs-rescue libguestfs-rsync libguestfs-zfs dracut-core autopsy mac-robber xfsdump quota以下のパッケージが新たにインストールされます: btrfs-progs db-util db5.3-util extlinux hfsplus ldmtool libafflib0v5 libconfig9 libdate-manip-perl libewf2 libguestfs-hfsplus libguestfs-perl libguestfs-reiserfs libguestfs-tools libguestfs-xfs libguestfs0 libhfsp0 libhivex0 libintl-perl libintl-xs-perl libldm-1.0-0 libstring-shellquote-perl libsys-virt-perl libtsk13 libwin-hivex-perl libxml-xpath-perl lsscsi mdadm reiserfsprogs scrub sgabios sleuthkit supermin xfsprogs zerofree アップグレード: 0 個、新規インストール: 35 個、削除: 0 個、保留: 2 個。 13.2 MB のアーカイブを取得する必要があります。 この操作後に追加で 71.7 MB のディスク容量が消費されます。 続行しますか? [Y/n] y -略- $ virt-v2v --version virt-v2v 1.36.13 |
vCenter下のESXiホストと疎通確認
manpageの実行例を参考に試してみるもエラー続きなので、まずはvCenterとの疎通確認から始めることに。
まず、vCenterへのログインユーザ名が Administrator@ABC.local のようになっているのを、URI文字列に含める場合にはコツがいります。
|
1 |
Administrator@ABC.local --> ABC.local%5cadministrator |
そして、vCenterにESXiホストはどのように登録されているのか確認し、その通りにESXiホストを指定すること。
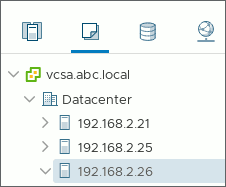
図1.vCenterとESXiホスト
ホスト名ではなくIPアドレスで登録されていたので、その通りに指定することで、ようやく仮想マシン一覧を取得することが出来ました。
|
1 2 3 4 5 6 7 8 9 10 11 12 13 14 15 |
$ virsh -c vpx://ABC.local%5cadministrator@192.168.2.23/Datacenter/192.168.2.26?no_verify=1 list --all Enter ABC.local\administrator's password for 192.168.2.23: Id Name State ---------------------------------------------------- 12048 ##### shut off 12245 ##### shut off 12248 ###### running 12258 ##### running 12302 ###### running - #### shut off - #### running - ##### shut off - ##### running - ##### running - ##### shut off |
このような単純な参照程度では弾かれませんが、vCenterの指定はIPアドレス( 192.168.2.23 )では認証が通らないこともあるので、FQDN名( vcsa.abc.local )にしておいた方が良さそうです。
CentOS VMをマイグレーション
実際にマイグレーションしたい仮想マシンは、ESXiホスト上で動くCentOS 6.8の小さなMySQLサーバで、仮想ディスクも20GB程度と小規模。
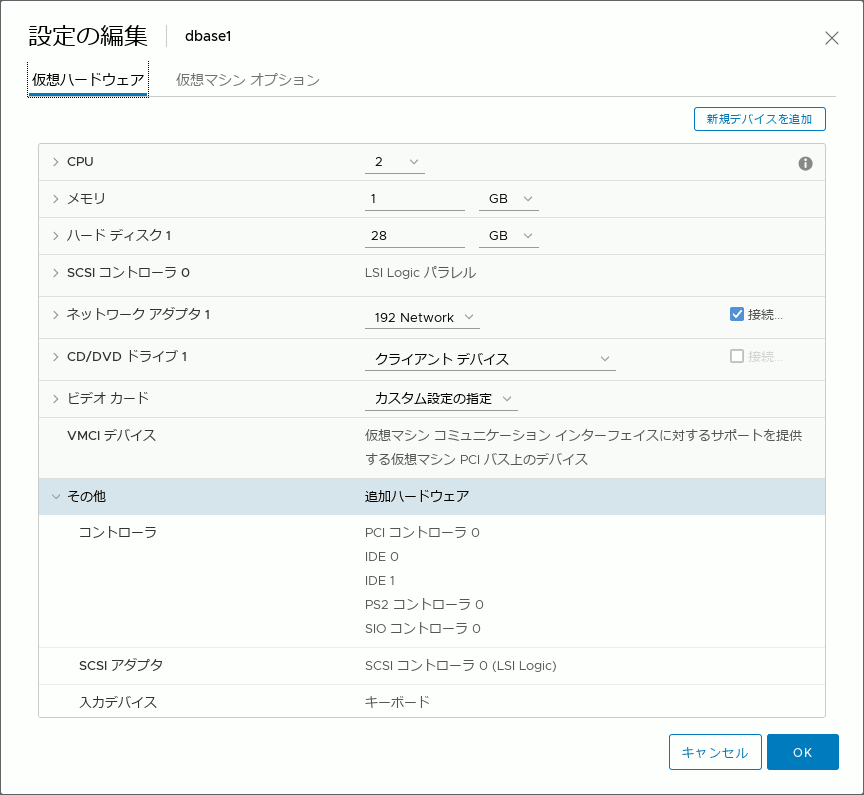
図2.変換元VMハードウェア
マイグレーション先はUbuntu 18.04の自機で構築されたQEMU/KVMです。システムとは別のHDDに確保した kvm と言う名のpoolが移転先です。
|
1 2 3 4 5 6 7 8 9 10 11 12 13 14 15 |
$ virsh pool-list Name State Autostart ------------------------------------------- default active yes iso active yes kvm active yes $ virsh pool-info kvm Name: kvm UUID: 56e1f73a-ad3b-47d9-bff7-969d5c0f4b51 State: running Persistent: yes Autostart: yes Capacity: 916.77 GiB Allocation: 632.25 GiB Available: 284.52 GiB |
それではvCenterからローカルQEMU/KVMへ、 virt-v2v で変換してみます。
実行するとまず、vCenterへのログインパスワードを都合2度聞かれるのは、内部でうまく渡せていないらしいので、仕様ということでしょう。
|
1 2 3 4 5 6 7 8 9 10 11 12 13 14 15 16 17 18 19 20 21 22 23 24 25 26 27 28 29 30 31 32 33 34 |
# virt-v2v -o libvirt -os kvm -of qcow2 -ic vpx://abc.local%5cadministrator@vcsa.abc.local/Datacenter/192.168.2.26?no_verify=1 dbase1 [ 0.0] Opening the source -i libvirt -ic vpx://abc.local%5cadministrator@vcsa.abc.local/Datacenter/192.168.2.26?no_verify=1 dbase1 Enter abc.local\administrator's password for vcsa.abc.local: Enter host password for user 'abc.local\administrator': [ 12.8] Creating an overlay to protect the source from being modified [ 13.4] Initializing the target -o libvirt -os kvm [ 13.5] Opening the overlay [ 31.1] Inspecting the overlay [ 335.8] Checking for sufficient free disk space in the guest [ 335.8] Estimating space required on target for each disk [ 335.8] Converting CentOS release 6.8 (Final) to run on KVM virt-v2v: This guest has virtio drivers installed. [2552.2] Mapping filesystem data to avoid copying unused and blank areas [2603.9] Closing the overlay [2604.1] Checking if the guest needs BIOS or UEFI to boot [2604.1] Assigning disks to buses [2604.1] Copying disk 1/1 to /str500/kvm/dbase1-sda (qcow2) (100.00/100%) [3303.2] Creating output metadata Pool kvm refreshed Domain dbase1 defined from /tmp/v2vlibvirt77f064.xml [3303.4] Finishing off $ virsh list --all Id Name State ---------------------------------------------------- - dbase1 shut off - plasma shut off - xampp1 shut off $ ls -l /str500/kvm -rw-r--r-- 1 root root 6017646592 Jul 5 23:54 dbase1-sda -rw------- 1 root root 32217432064 Jun 28 10:45 plasma.qcow2 -rw------- 1 root root 21478375424 Jul 5 16:41 xampp1.qcow2 |
20GBのVMがおよそ1時間弱で転送・変換されました。
Permission Deniedで起動しないVM
変換されたVMを早速起動させてみますが、このpoolにある他のVMは問題無く起動出来るのに、このVMだけが Permission Denied で立ち上がりません。
|
1 2 3 4 5 6 |
$ sudo virsh start dbase1 error: Failed to start domain dbase1 error: internal error: process exited while connecting to monitor: 2022-07-06T00:42:18.927396Z qemu-system-x86_64: -drive file=/str500/kvm/dbase1-sda,format=qcow2,if=none,id=drive-virtio-disk0,cache=none: Could not open '/str500/kvm/dbase1-sda': Permission denied |
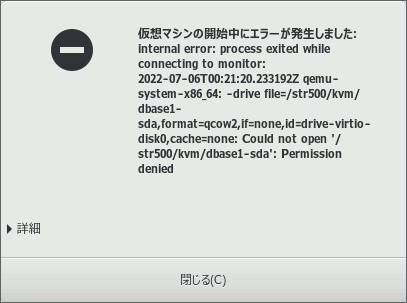
図3.Permission Errorで起動しない
てっきり仮想ディスクの所有権を疑うもおかしな点は見つからないのですが、当該VMのXMLファイルにある仮想ディスクの指定方法を次のように変えると起動することが分かりました。
|
1 2 3 4 5 6 7 8 9 10 11 12 13 14 15 |
× 起動しない <disk type='volume' device='disk'> <driver name='qemu' type='qcow2' cache='none'/> <source pool='kvm' volume='dbase1-sda'/> <target dev='vda' bus='virtio'/> <address type='pci' domain='0x0000' bus='0x00' slot='0x04' function='0x0'/> </disk> ○ 起動する <disk type='file' device='disk'> <driver name='qemu' type='qcow2'/> <source file='/str500/kvm/plasma.qcow2'/> <target dev='vda' bus='virtio'/> <address type='pci' domain='0x0000' bus='0x00' slot='0x06' function='0x0'/> </disk> |
この現象について検索してみると、こちらのスレッドに辿り着きました。

曰く、セキュリティドライバを無効に設定することで回避出来るとのこと。 /etc/libvirt/qemu.conf を次の要領で編集します。
|
1 2 3 4 5 6 7 8 9 10 11 12 13 14 15 16 17 18 |
# The default security driver is SELinux. If SELinux is disabled # on the host, then the security driver will automatically disable # itself. If you wish to disable QEMU SELinux security driver while # leaving SELinux enabled for the host in general, then set this # to 'none' instead. It's also possible to use more than one security # driver at the same time, for this use a list of names separated by # comma and delimited by square brackets. For example: # # security_driver = [ "selinux", "apparmor" ] # # Notes: The DAC security driver is always enabled; as a result, the # value of security_driver cannot contain "dac". The value "none" is # a special value; security_driver can be set to that value in # isolation, but it cannot appear in a list of drivers. # #security_driver = "selinux" ←変更前 security_driver = "none" ←変更後 |
設定ファイルを編集後、サービスを再起動させると起動エラーは解消されました。
|
1 2 3 |
$ sudo systemctl restart libvirtd $ virsh start dbase1 Domain dbase1 started |
NIC設定を編集
仮想ハードウェアのうち、NICはESXiホストにいた頃のままになっていたので、これを移行先の環境へ合わせます。
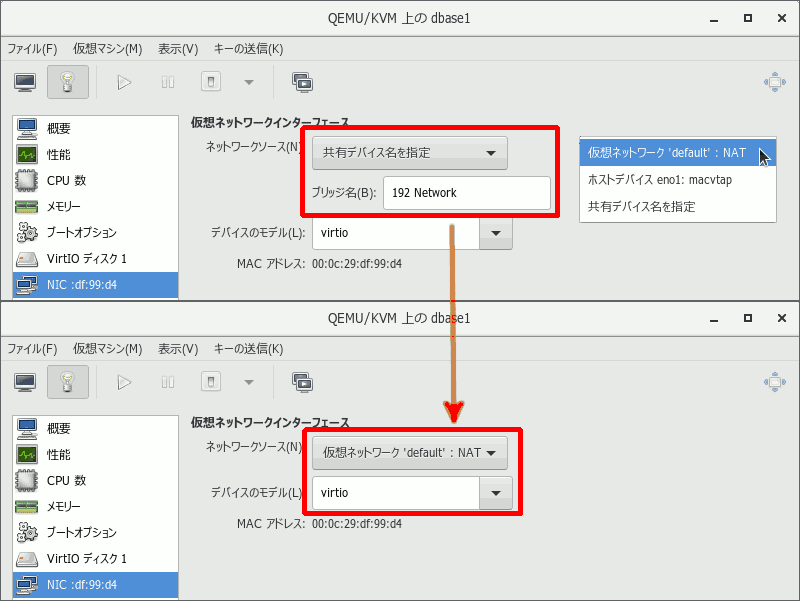
図4.NIC設定の変更
これはVM内のシステムにとっては全く別のNICが接続されたという扱いになるので、インターフェイス名が変わり、ひいてはその設定もやり直す必要がある場合も。
今回、移行前は eth0 へ固定IPを設定していましたが、新しいNIC名 eth1 へ変わったので /etc/sysconfig/network-scripts/ifcfg-eth0 を元に /etc/sysconfig/network-scripts/ifcfg-eth1 を作って、その内容を適宜変更しました。
|
1 2 3 4 5 6 7 8 9 10 11 12 13 |
NAME="eth1" DEVICE="eth1" ONBOOT="yes" TYPE="Ethernet" NETBOOT="no" BOOTPROTO="static" IPADDR="192.168.122.72" NETMASK="255.255.255.0" GATEWAY="192.168.122.1" DNS1="192.168.122.1" DEFROUTE="yes" |
virshからシャットダウン出来ない
こうして使えるようになったVMが最後に遭遇した不具合が、 virsh shutdown コマンドを発行してもシャットダウンされない、というもの。調べてみると、 virsh は仮想マシンへAPCIを通じて指示を送っているようです。

ここで思い当たるのが昔、この仮想マシンのシステムを最小構成にするために、不要なサービスを削除したこと。その中にAPCIが含まれていたのであらためてインストールします。
ところがCentOSのサポート終了に伴い、 yum の参照するレポジトリが変更されていることから、
|
1 2 3 4 5 6 7 8 |
# yum update 読み込んだプラグイン:fastestmirror 更新処理の設定をしています Determining fastest mirrors YumRepo Error: All mirror URLs are not using ftp, http[s] or file. Eg. Invalid release/repo/arch combination/ removing mirrorlist with no valid mirrors: /var/cache/yum/i386/6/base/mirrorlist.txt エラー: Cannot find a valid baseurl for repo: base |
まずレポジトリ設定ファイル /etc/yum.repos.d/CentOS-Base.repo に記載されているURLを以下の要領で書き換えます。
|
1 2 3 4 5 6 7 8 9 10 11 12 13 14 15 |
■変更前 [base] baseurl=http://mirror.centos.org/centos/$releasever/os/$basearch/ [updates] baseurl=http://mirror.centos.org/centos/$releasever/updates/$basearch/ [extras] baseurl=http://mirror.centos.org/centos/$releasever/extras/$basearch/ ■変更後 [base] baseurl=https://vault.centos.org/6.8/os/$basearch/ [updates] baseurl=https://vault.centos.org/6.8/updates/$basearch/ [extras] baseurl=https://vault.centos.org/6.8/extras/$basearch/ |
※変数 $releasever にはメジャー番号 6 しか包含されていない。
編集後レポジトリを読み直し、 acpid をインストールすると、 virsh shutdown に応じてシャットダウンしてくれるようになりました。
|
1 2 3 4 5 6 7 8 9 10 11 12 13 14 15 16 17 18 19 20 21 22 23 24 25 26 27 28 29 30 31 32 33 34 35 36 |
# nano /etc/yum.repos.d/CentOS-Base.repo # yum clean all # yum update # yum install acpid [root@dbase1 yum.repos.d]# yum install acpid 読み込んだプラグイン:fastestmirror インストール処理の設定をしています Loading mirror speeds from cached hostfile 依存性の解決をしています --> トランザクションの確認を実行しています。 ---> Package acpid.i686 0:1.0.10-3.el6 will be インストール --> 依存性解決を終了しました。 依存性を解決しました ======================================================================== パッケージ アーキテクチャ バージョン リポジトリー 容量 ======================================================================== インストールしています: acpid i686 1.0.10-3.el6 base 36 k トランザクションの要約 ======================================================================== インストール 1 パッケージ 総ダウンロード容量: 36 k インストール済み容量: 63 k これでいいですか? [y/Ny パッケージをダウンロードしています: acpid-1.0.10-3.el6.i686.rpm | 36 kB 00:00 rpm_check_debug を実行しています トランザクションのテストを実行しています トランザクションのテストを成功しました トランザクションを実行しています インストールしています : acpid-1.0.10-3.el6.i686 1/1 Verifying : acpid-1.0.10-3.el6.i686 1/1 インストール: acpid.i686 0:1.0.10-3.el6 完了しました! |
DebianベースVMには使えない
続いてもう一つ、Ubuntu 20.04ベースの仮想マシンを同様にマイグレーションしようとするも、こちらは異常終了します。
|
1 2 3 4 5 6 7 8 9 10 11 12 13 14 15 16 17 |
# virt-v2v -ic vpx://abc.local%5cadministrator@vcsa.abc.local/Datacenter/192.168.2.26?no_verify=1 apa3 [ 0.0] Opening the source -i libvirt -ic vpx://abc.local%5cadministrator@vcsa.abc.local/Datacenter/192.168.2.26?no_verify=1 apa3 Enter abc.local\administrator's password for vcsa.abc.local: Enter host password for user 'abc.local\administrator': [ 10.5] Creating an overlay to protect the source from being modified [ 11.0] Initializing the target -o libvirt -os default [ 11.1] Opening the overlay [ 20.5] Inspecting the overlay [ 32.3] Checking for sufficient free disk space in the guest [ 32.3] Estimating space required on target for each disk [ 32.3] Converting Ubuntu 20.04.2 LTS to run on KVM virt-v2v: warning: could not determine a way to update the configuration of Grub2 virt-v2v: error: no installed kernel packages were found. This probably indicates that virt-v2v was unable to inspect this guest properly. |
公式サイトやmanpageにもこの挙動に関しては、以下の記述を目にすることができます。
|
1 2 3 4 5 6 7 |
Debian and Ubuntu "warning: could not determine a way to update the configuration of Grub2" Currently, virt-v2v has no way to set the default kernel in Debian and Ubuntu guests using GRUB 2 as bootloader. This means that virt-v2v will not change the default kernel used for booting, even in case it is not the best kernel available on the guest. A recommended procedure is, before using virt-v2v, to check that the boot kernel is the best kernel available in the guest (for example by making sure the guest is up-to-date). |
試しに仮想マシン内で apt update をしてみるも解消されないので、 virt-v2v を用いての移行はあきらめて別途他の方法を模索します。

