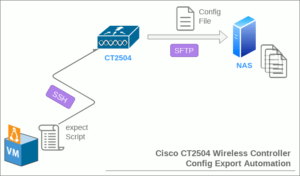
対話形式の単純な処理を自動化する expect を使って、Cisco WLC CT2504 の 設定 ファイルをNASへ自動的に定期 バックアップ するスクリプトを組んでみました。
CT2504設定のエクスポート要領
前回の記事の終わりに、Cisco WLC CT2504のSSHターミナルから以下の要領でコマンドを発行して、SFTPで設定ファイルをエクスポートしました。
|
1 2 3 4 5 6 7 8 9 10 11 12 13 14 15 16 17 18 19 20 21 22 23 24 25 26 27 28 29 30 31 32 33 34 35 |
$ ssh 192.168.2.201 (Cisco Controller) User: ###### Password:************** (Cisco Controller) >transfer upload mode sftp (Cisco Controller) >transfer upload datatype config (Cisco Controller) >transfer upload filename CT2504_20220520.txt (Cisco Controller) >transfer upload path /tmp (Cisco Controller) >transfer upload serverip 192.168.6.199 (Cisco Controller) >transfer upload username ###### (Cisco Controller) >transfer upload password ********* (Cisco Controller) >transfer upload start Mode............................................. SFTP SFTP Server IP................................... 192.168.6.199 SFTP Server Port................................. 22 SFTP Path........................................ /tmp/ SFTP Filename.................................... CT2504_20220520.txt SFTP Username.................................... ###### SFTP Password.................................... ********* Data Type........................................ Config File Encryption....................................... Disabled ************************************************** *** WARNING: Config File Encryption Disabled *** ************************************************** Are you sure you want to start? (y/N) y SFTP Config transfer starting. File transfer operation completed successfully. (Cisco Controller) >logout Connection to 192.168.2.201 closed. |
今回はこの一連の処理をexpectにより、下図の構成で自動化しようと思います。
なお、自動化スクリプト実行環境に使う、Ubuntu仮想マシンの基本情報は以下の通りです。
|
1 2 3 4 5 6 7 8 9 10 11 12 |
$ uname -a Linux vMA 4.4.0-210-generic #242-Ubuntu SMP Fri Apr 16 09:57:56 UTC 2021 x86_64 x86_64 x86_64 GNU/Linux $ lsb_release -a No LSB modules are available. Distributor ID: Ubuntu Description: Ubuntu 16.04.7 LTS Release: 16.04 Codename: xenial $ whereis expect expect: /usr/bin/expect /usr/share/man/man1/expect.1.gz $ expect -v expect version 5.45 |
expectでSSHログイン・ログアウト
まずはウォーミングアップとして、仮想マシンからCT2504へSSH接続して、ログイン・ログアウトするだけを仕組みを組んでみます。
|
1 2 3 4 5 6 7 8 9 10 11 12 13 14 15 16 17 18 19 20 21 22 23 24 25 26 |
#!/usr/bin/expect -f # Set variables set uname ####### set pass ############### set target 192.168.2.201 # Automation spawn ssh $target expect { "User:" {send "$uname\n"} timeout { exit } } expect "Password:" send "$pass\n" expect ">" send "logout\n" expect { "Would you like to save them now? (y/N) " {send "n"} "closed." { exit } timeout { exit } } expect eof |
実行結果はまず、平常時はこのようになるのですが、
|
1 2 3 4 5 6 7 |
$ ./pushcfg_CT2504.sh spawn ssh 192.168.2.201 (Cisco Controller) User: ###### Password:************** (Cisco Controller) >logoutConnection to 192.168.2.201 closed. |
なんらかの理由により、コントローラ上に保存していない設定が残っている場合は、ログアウト時に保存するかどうかのプロンプトが現れるので、保存せずにログアウトするようにしています。
|
1 2 3 4 5 6 7 8 9 10 |
$ ./pushcfg_CT2504.sh spawn ssh 192.168.2.201 (Cisco Controller) User: ###### Password:************** (Cisco Controller) >logout The system has unsaved changes. Would you like to save them now? (y/N) n Connection to 192.168.2.201 closed. |
設定ファイル名に使う日付文字列の生成
シェルスクリプトでは日付文字列の生成は date コマンドにフォーマット書式を付けて実行した結果を使いますが、Tclでは少し勝手が異なりました。
|
1 2 3 4 5 |
set fname CT2504_[exec date +%Y%m%d].txt send "$fname\n" 実行結果例) CT2504_20220608.txt |
完成したexpectスクリプト
|
1 2 3 4 5 6 7 8 9 10 11 12 13 14 15 16 17 18 19 20 21 22 23 24 25 26 27 28 29 30 31 32 33 34 35 36 37 38 39 40 41 42 43 44 45 46 47 48 49 50 51 52 53 54 55 56 57 |
#!/usr/bin/expect -f # Set variables set timeout 60 set uname ###### set pass ############### set target 192.168.2.201 set fsvr 192.168.2.31 set fpath /mnt/md0/config/CT2504 set fname CT2504_[exec date +%Y%m%d].txt set funame ###### set fupass ########### # Automation Login spawn ssh $target expect { "User:" {send "$uname\n"} timeout { exit } } expect "Password:" send "$pass\n" # Issue Commands for SFTP Export expect ">" send "transfer upload mode sftp\n" expect ">" send "transfer upload datatype config\n" expect ">" send "transfer upload filename $fname\n" expect ">" send "transfer upload path $fpath\n" expect ">" send "transfer upload serverip $fsvr\n" expect ">" send "transfer upload username $funame\n" expect ">" send "transfer upload password $fupass\n" expect ">" send "transfer upload start\n" expect "Are you sure you want to start? (y/N)" send "y" expect "File transfer operation completed successfully." send "\n" # Automation Logout expect ">" send "logout\n" expect { "Would you like to save them now? (y/N) " {send "n"} "closed." { exit } timeout { exit } } expect eof |
実行結果はこのようになります。実際のSFTP転送に掛かる時間は、ネットワーク環境や設定ファイルの大きさにも依りますが、30秒もみておけば大丈夫でしょう。これを元に冒頭で set timetout の数字を調整しています(デフォルトは10秒)。
|
1 2 3 4 5 6 7 8 9 10 11 12 13 14 15 16 17 18 19 20 21 22 23 24 25 26 27 28 29 30 31 32 33 34 35 36 37 38 |
$ ./pushcfg_CT2504.sh spawn ssh 192.168.2.201 (Cisco Controller) User: ###### Password:************** (Cisco Controller) >transfer upload mode sftp (Cisco Controller) >transfer upload datatype config (Cisco Controller) >transfer upload filename CT2504_20220609.txt (Cisco Controller) >transfer upload path /mnt/md0/config/CT2504 (Cisco Controller) >transfer upload serverip 192.168.2.31 (Cisco Controller) >transfer upload username ###### (Cisco Controller) >transfer upload password ########### (Cisco Controller) >transfer upload start Mode............................................. SFTP SFTP Server IP................................... 192.168.2.31 SFTP Server Port................................. 22 SFTP Path........................................ /mnt/md0/config/CT2504/ SFTP Filename.................................... CT2504_20220609.txt SFTP Username.................................... ###### SFTP Password.................................... ********* Data Type........................................ Config File Encryption....................................... Disabled ************************************************** *** WARNING: Config File Encryption Disabled *** ************************************************** Are you sure you want to start? (y/N) y SFTP Config transfer starting. File transfer operation completed successfully. (Cisco Controller) > (Cisco Controller) >logout Connection to 192.168.2.201 closed. |
これをcronへ登録すれば完成です。数日放置してみましたが思惑通りに毎晩、設定ファイルがNASへ出力されていました。
|
1 2 3 4 |
[root@DNS-323]# ls -l /mnt/md0/config/CT2504/ -rw-r--r-- 1 root root 29358 Jun 8 21:15 CT2504_20220608.txt -rw-r--r-- 1 root root 29358 Jun 9 21:15 CT2504_20220609.txt -rw-r--r-- 1 root root 29358 Jun 10 21:15 CT2504_20220610.txt |
ちなみにNASはカスタムファームウェアAlt-Fへ入れ替えた、D-Link DNS-323 2-Bay Enclosureを使っています。
コントローラの設定というはそう頻繁に変更されるものでもないので、実際は週一程度の実行頻度で十分でしょう。
但し、このまま長期間放置しているとNASに設定ファイルが溢れるので、以前書いたこちらの仕組みを使って、古いものから定期自動削除するようにしておきます。


