いよいよJ4125産業用ミニPCに構築した VMware ESXi 8.0 ハイパーバイザ内に、 OpenWRT の 仮想マシン を構築します。OpenWRT の公式イメージを容量拡張の上、仮想ディスクへ変換してインポートするだけでは起動せず、結局互換性を ESXi 6.5 まで落とすことで起動するようになりました。
OpenWRT 22.03イメージを伸長
OpenWRT公式サイトのダウンロードページより、x86_64プラットフォーム向けで永続的なext4ファイルシステム仕様のイメージ( generic-ext4-combined-efi.img.gz )をダウンロード、解凍します(以降の作業はUbuntu 18.04デスクトップで進めます)。

|
1 2 3 4 5 6 7 8 9 10 11 12 13 14 15 |
$ wget https://downloads.openwrt.org/releases/22.03.2/targets/x86/64/openwrt-22.03.2-x86-64-generic-ext4-combined-efi.img.gz https://downloads.openwrt.org/releases/22.03.2/targets/x86/64/openwrt-22.03.2-x86-64-generic-ext4-combined-efi.img.gz downloads.openwrt.org (downloads.openwrt.org) をDNSに問いあわせています... 168.119.138.211, 2a01:4f8:251:321::2 downloads.openwrt.org (downloads.openwrt.org)|168.119.138.211|:443 に接続しています... 接続しました。 HTTP による接続要求を送信しました、応答を待っています... 200 OK 長さ: 12039642 (11M) [application/octet-stream] ‘openwrt-22.03.2-x86-64-generic-ext4-combined-efi.img.gz’ に保存中 openwrt-22.03.2-x86-64-generic-ext4-combin 100%[==============================================>] 11.48M 247KB/s in 56s 2022-11-19 22:28:48 (211 KB/s) - ‘openwrt-22.03.2-x86-64-generic-ext4-combined-efi.img.gz’ へ保存完了 [12039642/12039642] $ gzip -dk ./openwrt-22.03.2-x86-64-generic-ext4-combined-efi.img.gz gzip: ./openwrt-22.03.2-x86-64-generic-ext4-combined-efi.img.gz: decompression OK, trailing garbage ignored $ ls -l -rw-rw-r-- 1 user user 126123520 Oct 16 07:16 openwrt-22.03.2-x86-64-generic-ext4-combined-efi.img -rw-rw-r-- 1 user user 12039642 Oct 16 07:16 openwrt-22.03.2-x86-64-generic-ext4-combined-efi.img.gz |
以前、Raspberry Piのシステムイメージで実践した時と同じ要領で、解凍したディスクイメージをループデバイスに登録して、
|
1 2 3 4 5 6 7 8 9 10 11 12 |
$ losetup -f /dev/loop21 $ sudo losetup -P /dev/loop21 ./openwrt-22.03.2-x86-64-generic-ext4-combined-efi.img $ losetup -l /dev/loop21 NAME SIZELIMIT OFFSET AUTOCLEAR RO BACK-FILE DIO LOG-SEC /dev/loop30 0 0 0 0 openwrt-22.03.2-x86-64-generic-ext4-combined-efi.img 0 512 $ lsblk /dev/loop21 NAME MAJ:MIN RM SIZE RO TYPE MOUNTPOINT loop21 7:21 0 120.3M 0 loop ├─loop21p1 259:0 0 16M 0 loop ├─loop21p2 259:1 0 104M 0 loop └─loop21p128 259:2 0 239K 0 loop |
パーティション構成を確認してみます。
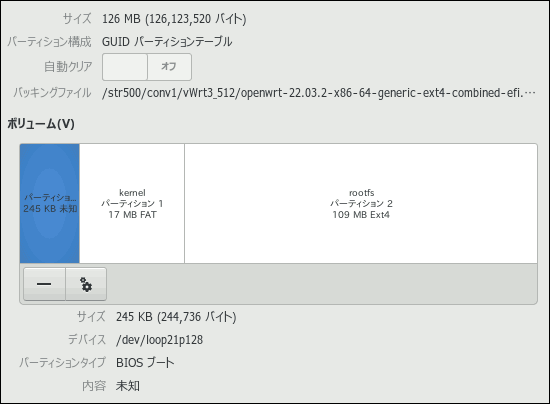
図01.OpenWRTオリジナル構成
|
1 2 3 |
$ sudo losetup -d /dev/loop21 $ losetup -f /dev/loop21 |
このイメージをまず、 qemu-img resize で512MBまで伸長します。
|
1 2 3 4 5 |
$ qemu-img resize -f raw ./openwrt-22.03.2-x86-64-generic-ext4-combined-efi.img 512M Image resized. $ ls -l -rw-rw-r-- 1 user user 536870912 Nov 20 21:16 openwrt-22.03.2-x86-64-generic-ext4-combined-efi.img -rw-rw-r-- 1 user user 12039642 Oct 16 07:16 openwrt-22.03.2-x86-64-generic-ext4-combined-efi.img.gz |
伸長したイメージを再びループデバイスで確認してみると、この時点ではまだ既存構成の後方に空き領域が生成されただけの状態です。
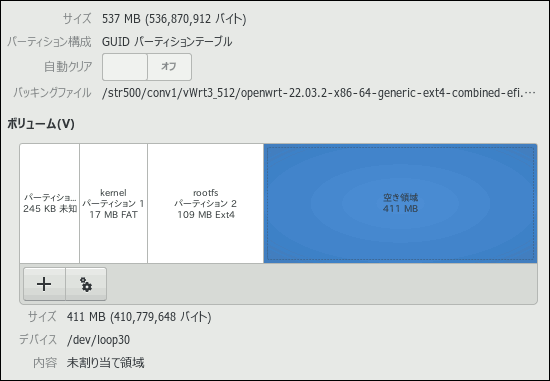
図02.qemu-imgでイメージ伸長
伸長したイメージに合わせパーティションを拡張
次に gdisk でルートパーティションを空き領域いっぱいまで拡張します。
fdisk もそうですが、既存のパーティションをリサイズする機能は存在しないので、実際にはパーティションを削除し、同じ開始セクタから大きな領域を新規作成するという段取りになります。なので、削除前にはそのパーティション情報を詳細まで忘れずに確認(開始セクタとパーティションGUID)のこと。
その前に gdisk が問題点を指摘する場合は、それらを全て解消する必要があります。
|
1 2 3 4 5 6 7 8 9 10 11 12 13 14 15 16 17 18 19 20 21 22 23 24 25 26 27 28 29 30 31 32 33 34 35 36 37 38 39 40 41 42 43 44 45 46 47 48 49 50 51 52 53 |
$ gdisk ./openwrt-22.03.2-x86-64-generic-ext4-combined-efi.img GPT fdisk (gdisk) version 1.0.3 Caution: invalid backup GPT header, but valid main header; regenerating backup header from main header. Warning! Main and backup partition tables differ! Use the 'c' and 'e' options on the recovery & transformation menu to examine the two tables. Warning! One or more CRCs don't match. You should repair the disk! Partition table scan: MBR: protective BSD: not present APM: not present GPT: damaged **************************************************************************** Caution: Found protective or hybrid MBR and corrupt GPT. Using GPT, but disk verification and recovery are STRONGLY recommended. **************************************************************************** Command (? for help): v Caution: The CRC for the backup partition table is invalid. This table may be corrupt. This program will automatically create a new backup partition table when you save your partitions. Problem: The secondary header's self-pointer indicates that it doesn't reside at the end of the disk. If you've added a disk to a RAID array, use the 'e' option on the experts' menu to adjust the secondary header's and partition table's locations. Identified 2 problems! Command (? for help): x Expert command (? for help): e Relocating backup data structures to the end of the disk Expert command (? for help): v Caution: The CRC for the backup partition table is invalid. This table may be corrupt. This program will automatically create a new backup partition table when you save your partitions. Identified 1 problems! Expert command (? for help): w Final checks complete. About to write GPT data. THIS WILL OVERWRITE EXISTING PARTITIONS!! Do you want to proceed? (Y/N): y OK; writing new GUID partition table (GPT) to ./openwrt-22.03.2-x86-64-generic-ext4-combined-efi.img. Warning: The kernel is still using the old partition table. The new table will be used at the next reboot or after you run partprobe(8) or kpartx(8) The operation has completed successfully. |
再び gdisk を実行し、パーティション情報を確認します。
|
1 2 3 4 5 6 7 8 9 10 11 12 13 14 15 16 17 18 19 20 21 22 23 24 25 26 27 28 29 30 31 32 33 34 35 36 37 38 39 |
$ gdisk ./openwrt-22.03.2-x86-64-generic-ext4-combined-efi.img GPT fdisk (gdisk) version 1.0.3 Partition table scan: MBR: protective BSD: not present APM: not present GPT: present Found valid GPT with protective MBR; using GPT. Command (? for help): v No problems found. 802271 free sectors (391.7 MiB) available in 1 segments, the largest of which is 802271 (391.7 MiB) in size. Command (? for help): p Disk ./openwrt-22.03.2-x86-64-generic-ext4-combined-efi.img: 1048576 sectors, 512.0 MiB Sector size (logical): 512 bytes Disk identifier (GUID): C120D9F5-D6F9-D15B-05A7-0D348F8A4B00 Partition table holds up to 128 entries Main partition table begins at sector 2 and ends at sector 33 First usable sector is 34, last usable sector is 1048542 Partitions will be aligned on 2-sector boundaries Total free space is 802271 sectors (391.7 MiB) Number Start (sector) End (sector) Size Code Name 1 512 33279 16.0 MiB 8300 2 33280 246271 104.0 MiB 8300 128 34 511 239.0 KiB EF02 Command (? for help): i Partition number (1-128): 2 Partition GUID code: 0FC63DAF-8483-4772-8E79-3D69D8477DE4 (Linux filesystem) Partition unique GUID: C120D9F5-D6F9-D15B-05A7-0D348F8A4B02 First sector: 33280 (at 16.3 MiB) Last sector: 246271 (at 120.2 MiB) Partition size: 212992 sectors (104.0 MiB) Attribute flags: 0000000000000000 Partition name: '' |
続けてパーティションの削除と新規作成(終端はディスクいっぱいまで)。
|
1 2 3 4 5 6 7 8 9 10 11 12 13 14 15 16 17 18 19 20 21 22 23 24 25 26 27 28 29 30 31 32 33 34 35 |
Command (? for help): d Partition number (1-128): 2 Command (? for help): n Partition number (2-128, default 2): 2 First sector (33280-1048542, default = 33280) or {+-}size{KMGTP}: Last sector (33280-1048542, default = 1048542) or {+-}size{KMGTP}: Current type is 'Linux filesystem' Hex code or GUID (L to show codes, Enter = 8300): Changed type of partition to 'Linux filesystem' Command (? for help): p Disk ./openwrt-22.03.2-x86-64-generic-ext4-combined-efi.img: 1048576 sectors, 512.0 MiB Sector size (logical): 512 bytes Disk identifier (GUID): C120D9F5-D6F9-D15B-05A7-0D348F8A4B00 Partition table holds up to 128 entries Main partition table begins at sector 2 and ends at sector 33 First usable sector is 34, last usable sector is 1048542 Partitions will be aligned on 2-sector boundaries Total free space is 0 sectors (0 bytes) Number Start (sector) End (sector) Size Code Name 1 512 33279 16.0 MiB 8300 2 33280 1048542 495.7 MiB 8300 Linux filesystem 128 34 511 239.0 KiB EF02 Command (? for help): i Partition number (1-128): 2 Partition GUID code: 0FC63DAF-8483-4772-8E79-3D69D8477DE4 (Linux filesystem) Partition unique GUID: 9473FF04-868C-4DD4-8924-67D6D1459E20 First sector: 33280 (at 16.3 MiB) Last sector: 1048542 (at 512.0 MiB) Partition size: 1015263 sectors (495.7 MiB) Attribute flags: 0000000000000000 Partition name: 'Linux filesystem' |
このままでは拡張したルートパーティションのUUIDが、システムの /etc/fstab に記述してあるものと異なるため、これをエキスパートモードに入って編集し、パーティションテーブルへ書き込みます。
|
1 2 3 4 5 6 7 8 9 10 11 12 13 14 15 16 17 18 19 20 21 22 23 24 25 26 27 28 29 30 31 32 33 34 |
Command (? for help): x Expert command (? for help): c Partition number (1-128): 2 Enter the partition's new unique GUID ('R' to randomize): C120D9F5-D6F9-D15B-05A7-0D348F8A4B02 New GUID is C120D9F5-D6F9-D15B-05A7-0D348F8A4B02 Expert command (? for help): i Partition number (1-128): 2 Partition GUID code: 0FC63DAF-8483-4772-8E79-3D69D8477DE4 (Linux filesystem) Partition unique GUID: C120D9F5-D6F9-D15B-05A7-0D348F8A4B02 First sector: 33280 (at 16.3 MiB) Last sector: 1048542 (at 512.0 MiB) Partition size: 1015263 sectors (495.7 MiB) Attribute flags: 0000000000000000 Partition name: 'Linux filesystem' Expert command (? for help): w Final checks complete. About to write GPT data. THIS WILL OVERWRITE EXISTING PARTITIONS!! Do you want to proceed? (Y/N): y OK; writing new GUID partition table (GPT) to ./openwrt-22.03.2-x86-64-generic-ext4-combined-efi.img. Warning: The kernel is still using the old partition table. The new table will be used at the next reboot or after you run partprobe(8) or kpartx(8) The operation has completed successfully. $ partx -s ./openwrt-22.03.2-x86-64-generic-ext4-combined-efi.img NR START END SECTORS SIZE NAME UUID 1 512 33279 32768 16M c120d9f5-d6f9-d15b-05a7-0d348f8a4b01 2 33280 1048542 1015263 495.8M Linux filesystem c120d9f5-d6f9-d15b-05a7-0d348f8a4b02 128 34 511 478 239K c120d9f5-d6f9-d15b-05a7-0d348f8a4b80 |
そして中のファイルシステムをパーティションに合わせて拡張すれば、イメージ拡張作業は終わりです。
|
1 2 3 4 5 6 7 8 9 10 11 12 13 14 15 16 17 18 19 |
$ losetup -f /dev/loop30 $ sudo losetup -P /dev/loop30 ./openwrt-22.03.2-x86-64-generic-ext4-combined-efi.img $ sudo fsck.ext4 -y /dev/loop30p2 e2fsck 1.44.1 (24-Mar-2018) rootfs: clean, 1445/6656 files, 5177/26624 blocks $ sudo resize2fs /dev/loop30p2 resize2fs 1.44.1 (24-Mar-2018) Resizing the filesystem on /dev/loop30p2 to 126907 (4k) blocks. The filesystem on /dev/loop30p2 is now 126907 (4k) blocks long. $ sudo losetup -d /dev/loop30 $ losetup -f /dev/loop30 $ ls -l -rw-rw-r-- 1 user user 536870912 Nov 20 21:27 openwrt-22.03.2-x86-64-generic-ext4-combined-efi.img -rw-rw-r-- 1 user user 12039642 Oct 16 07:16 openwrt-22.03.2-x86-64-generic-ext4-combined-efi.img.gz |

図03.gdiskでパーティション拡張
イメージを仮想ディスクへ変換
出来上がった512MB拡張イメージを qemu-img convert でVMware仮想ディスクへ変換します。
|
1 2 3 4 5 |
$ qemu-img convert -f raw -O -o compat6 vmdk openwrt-22.03.2-x86-64-generic-ext4-combined-efi.img openwrt-22.03.2-x86-64-generic-ext4-combined-efi-512m.vmd $ ls -l -rw-r--r-- 1 user user 26673152 Nov 21 11:44 openwrt-22.03.2-x86-64-generic-ext4-combined-efi-512m.vmdk -rw-rw-r-- 1 user user 536870912 Nov 21 11:13 openwrt-22.03.2-x86-64-generic-ext4-combined-efi.img -rw-rw-r-- 1 user user 12039642 Oct 16 07:16 openwrt-22.03.2-x86-64-generic-ext4-combined-efi.img.gz |
ESXi 8.0デフォルトでは仮想ディスク接続エラー
こうして出来上がったOpenWRT仮想ディスクをVMware ESXi 8.0ホストへ転送し、仮想マシンの新規作成ウィザードでこの仮想ディスクを指定すると、次のエラーに遭遇してしまいます。
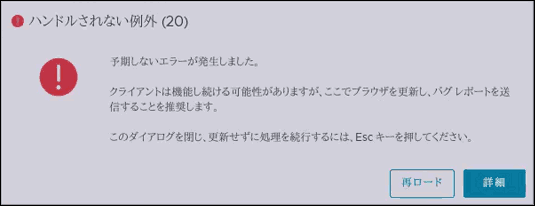
図04.仮想ディスク指定時にエラー
ESXi 8.0はまだまだ情報は少ないものの、それ以前のバージョンでは問題無く仮想マシンを構築できている事例が散見されることから、仮想マシン作成時のハードウェアバージョンの設定問題なのかと思われます。
正常に起動するOpenWRT仮想マシンの作り方
設定を変えながら試行錯誤を繰り返して、ようやく正常に起動できる仮想マシンを作る手順を見出すことができました。
まず、ESXi Host Clientの仮想マシンの作成ウィザードで新規仮想マシンの作成を選択。

図05.新規仮想マシンの作成
次の名前とゲストOSなどを設定するこの遷移では、必ず互換性の欄で ESXi 6.5仮想マシン を指定します。
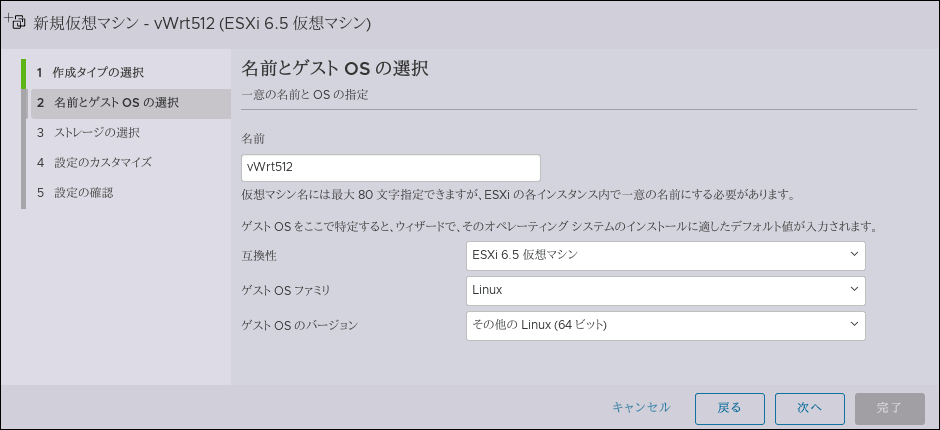
図06.名前とゲストOSの選択
ストレージの選択はそのまま次へ。
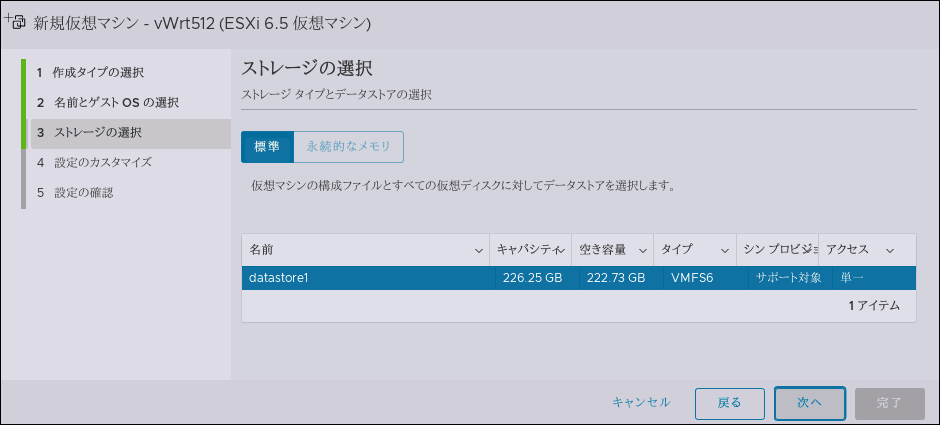
図07.ストレージの選択
仮想マシンのハードウェア設定は全体では次のような構成で、SCSCIコントローラタイプを LSI Logic Parallel に変えています。
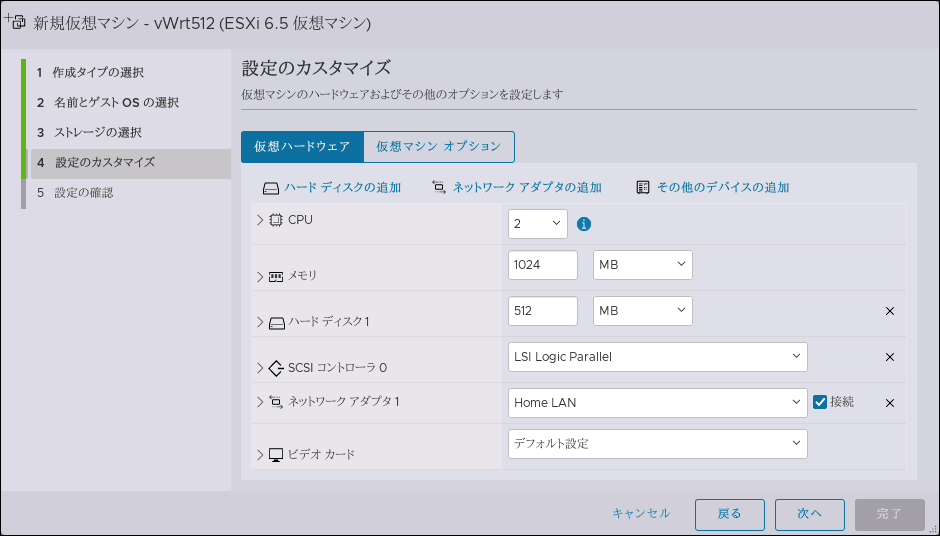
図08.仮想ハードウェア設定全体
そしてハードディスクは、先ほど作成したイメージと同じサイズのをシン・プロビジョニングで新規作成しています。
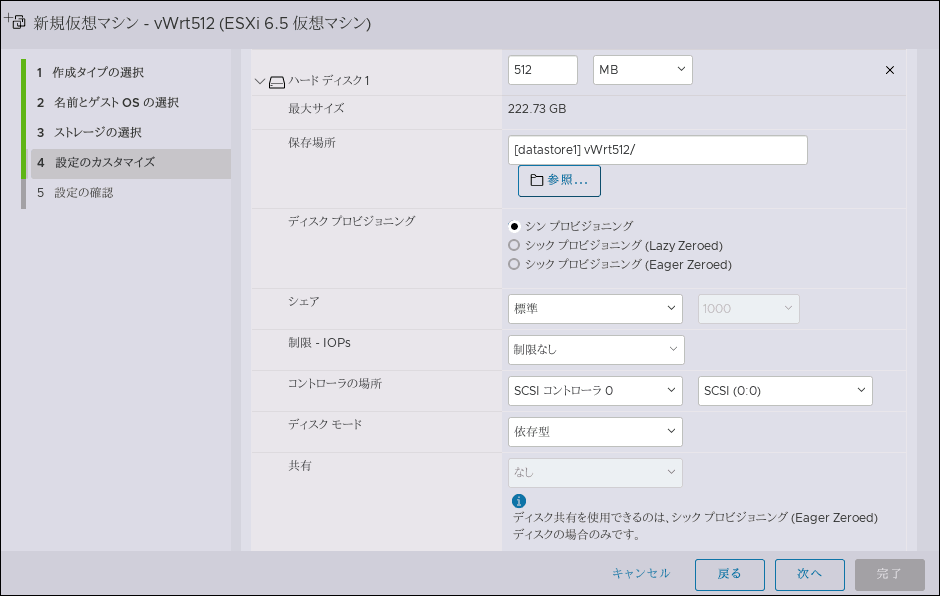
図09.仮想ハードディスク新規作成
仮想マシンのオプションでは、起動オプションをEFIに変えましたが、BIOSのままでもなぜか正常に起動します。
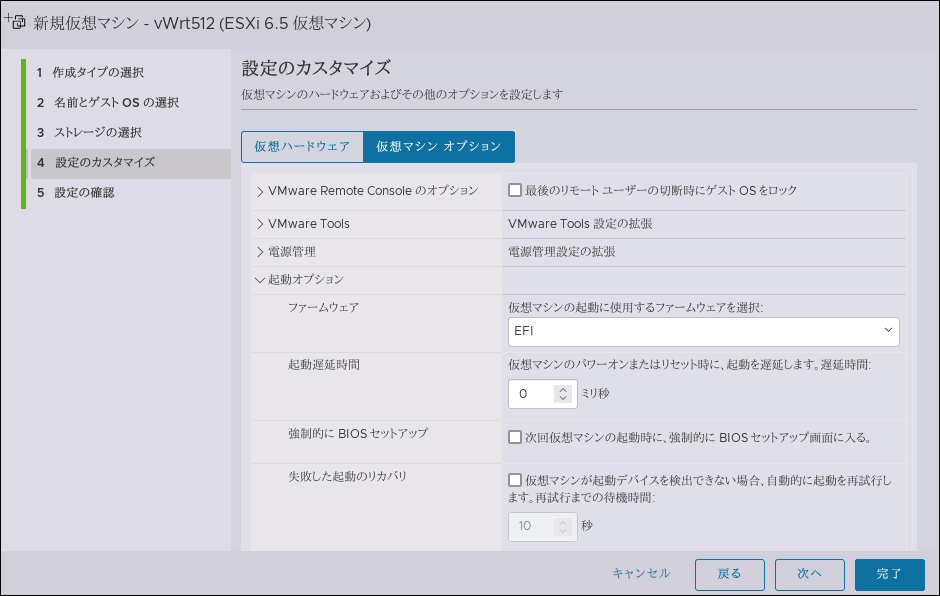
図10.仮想マシンの起動オプション
ここまでの設定サマリを確認してウィザードを終了します。
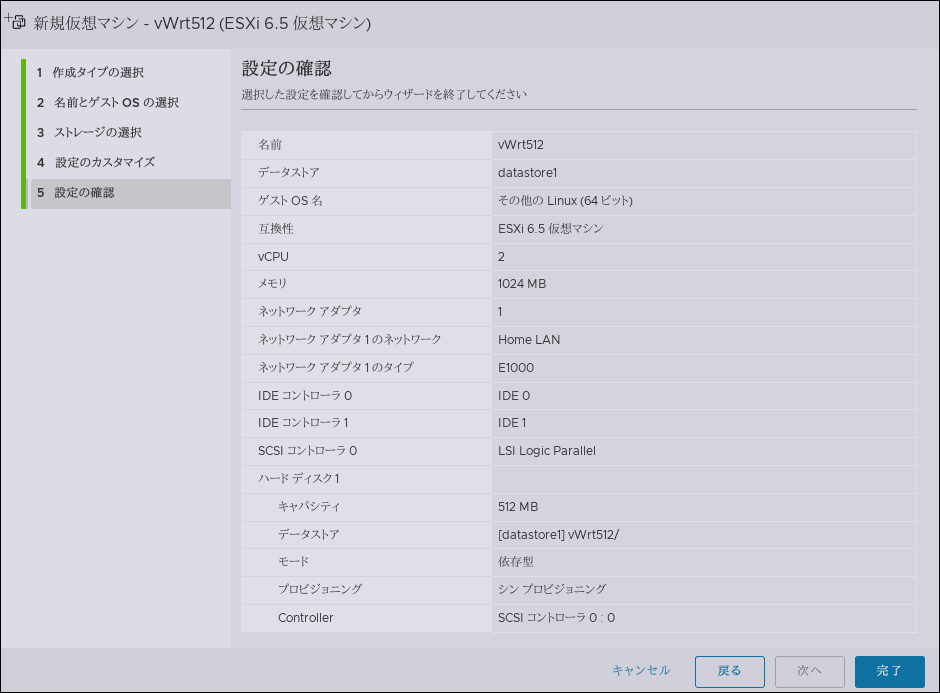
図11.設定サマリの確認と終了
この仮想マシンには触らず、ESXiホストのsshを有効にしてターミナルから、以下の要領で作成したばかりの仮想ディスクを削除します。
|
1 2 3 4 5 6 7 8 9 |
[root@localhost:/vmfs/volumes/datastore1] ls -l vWrt512/ -rw------- 1 root root 536870912 Nov 21 08:20 vWrt512-flat.vmdk -rw------- 1 root root 444 Nov 21 08:20 vWrt512.vmdk -rw-r--r-- 1 root root 0 Nov 21 08:20 vWrt512.vmsd -rwxr-xr-x 1 root root 1871 Nov 21 08:20 vWrt512.vmx [root@localhost:/vmfs/volumes/datastore1] rm -f vWrt512/*.vmdk [root@localhost:/vmfs/volumes/datastore1] ls -l vWrt512/ -rw-r--r-- 1 root root 0 Nov 21 08:20 vWrt512.vmsd -rwxr-xr-x 1 root root 1871 Nov 21 08:20 vWrt512.vmx |
そして、512MBへ拡張したOpenWRT仮想ディスクを vmkfstools で仮想マシンのフォルダへクローニングします。
|
1 2 3 4 5 6 7 8 9 10 11 12 |
[root@localhost:/vmfs/volumes/datastore1] ls -l iso/ -rw-r--r-- 1 root root 26673152 Nov 21 03:29 openwrt-22.03.2-x86-64-generic-ext4-combined-efi-512m.vmdk [root@localhost:/vmfs/volumes/datastore1] vmkfstools -d thin -i iso/openwrt-22.03.2-x86-64-generic-ext4-combined-efi- 512m.vmdk vWrt512/vWrt512.vmdk Destination disk format: VMFS thin-provisioned Cloning disk 'iso/openwrt-22.03.2-x86-64-generic-ext4-combined-efi-512m.vmdk'... Clone: 100% done. [root@localhost:/vmfs/volumes/datastore1] ls -l vWrt512/ -rw------- 1 root root 536870912 Nov 21 08:20 vWrt512-flat.vmdk -rw------- 1 root root 499 Nov 21 08:20 vWrt512.vmdk -rw-r--r-- 1 root root 0 Nov 21 08:20 vWrt512.vmsd -rwxr-xr-x 1 root root 1871 Nov 21 08:20 vWrt512.vmx |
再びESXi Host Clientに戻って仮想マシンをパワーオンさせると、エラーもなく正常に起動しました。
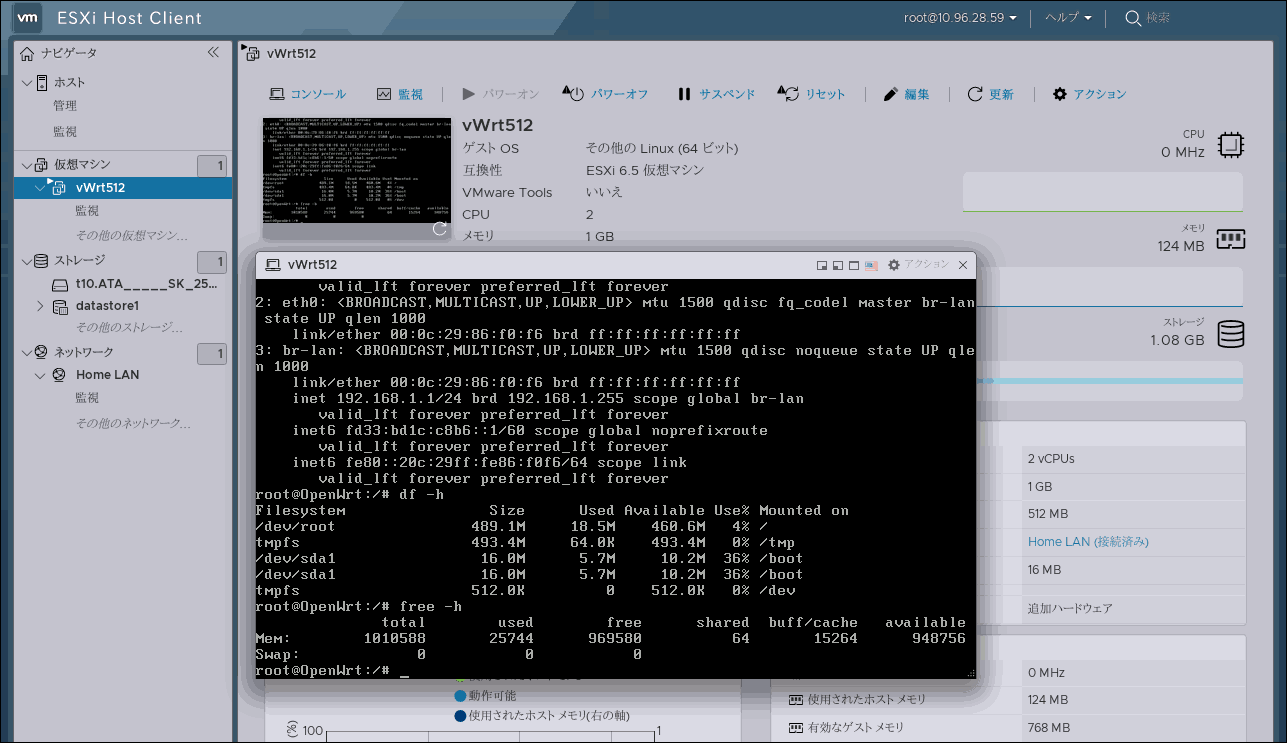
図12.入れ替えた仮想ディスクで起動
VMware WorkStation 16なら
余談ですが、VMware WorkStation 16では作成した仮想ディスクを元に仮想マシンを問題無く構築することができるので、それをさらにOVF形式にエクスポートし、ESXi 8.0ホストへインポートするという手も有効です。
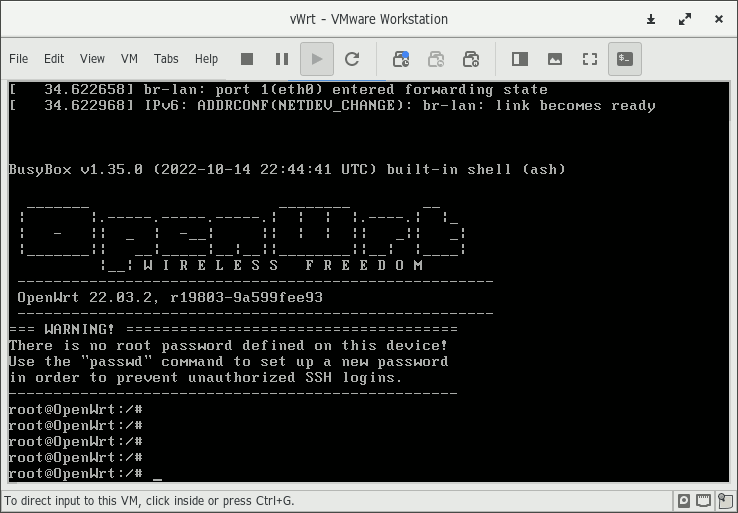
図13.VMware Workstationでの動作
本来ならばルータらしく仮想NICを組むところまで進めたかったのですが、正常に起動する仮想マシンを構築するところで手間取ってしまったので、今回はここまでです。
