中古の Intel NUC8i7BEH へ Kubuntu 22.04 デスクトップをインストール。その後の初期設定でインストールしたアプリの作業記録をまとめました。
Intel NUC8i7BEHにKubuntu 22.04.3をインストール
普段使いのデスクトップPCにしようと、以前から整備してきた中古のIntel NUC8i7BEH(関連記事はこちら)へようやく、Kubuntu 22.04.3デスクトップをインストールしました。
|
1 2 3 4 5 6 7 8 9 |
$ uname -a Linux NUC8i7BEH 6.2.0-31-generic #31~22.04.1-Ubuntu SMP PREEMPT_DYNAMIC Wed Aug 16 13:45:26 UTC 2 x86_64 x86_64 x86_64 GNU/Linux $ lsb_release -a No LSB modules are available. Distributor ID: Ubuntu Description: Ubuntu 22.04.3 LTS Release: 22.04 Codename: jammy |
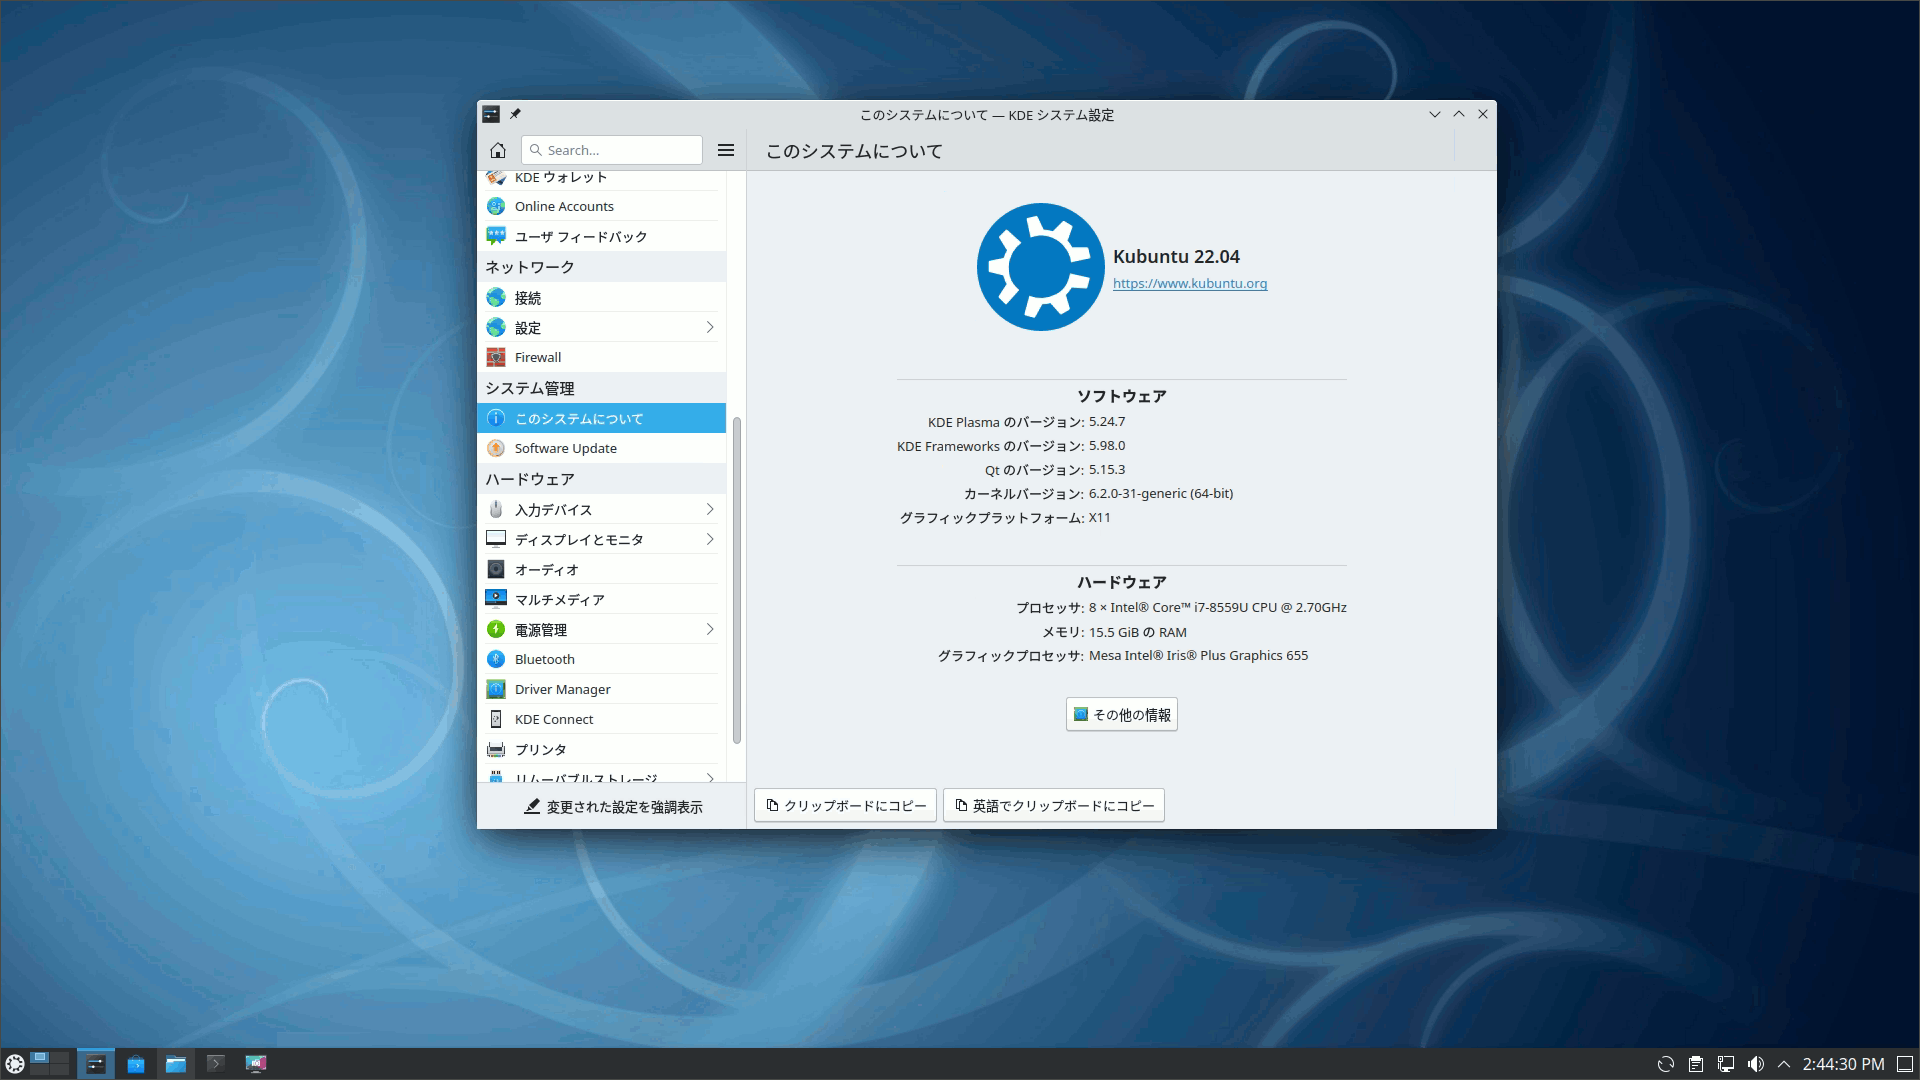
図1.Kubuntu 22.04 システムについて
セットアップはデスクトップとは言え、ブラウザなど最小限のアプリのインストールにとどめておいたので、ここから必要なアプリを入れて普段使いのPCに仕上げたいと思います。
その手順は以前、Ubuntu 18.04から22.04へアップグレードした際の作業をまとめた、こちらの記事に準じています。

FirefoxをSnap版からPPA版へ
Firefoxはいつもの通り、既存のSnap版を抜いてから公式PPAを追加しました。
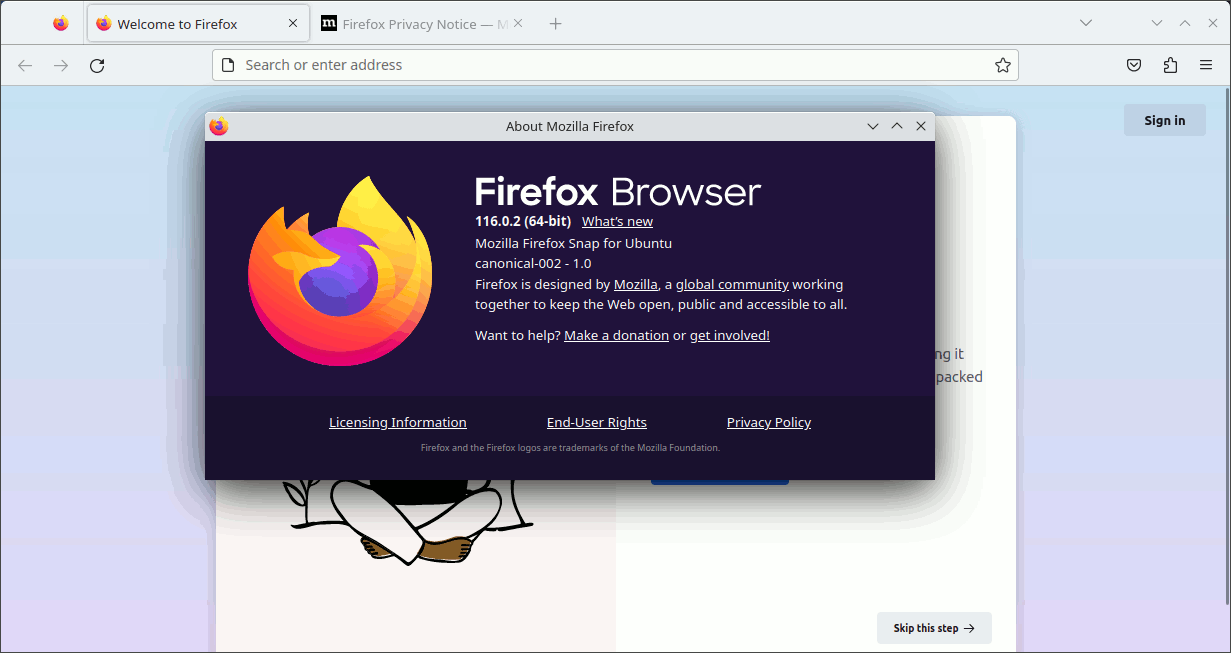
図2.Snap版Firefox
|
1 2 3 4 5 6 7 8 9 10 11 12 13 14 15 16 |
$snap list Name Version Rev Tracking Publisher Notes bare 1.0 5 latest/stable canonical✓ base core20 20230801 2015 latest/stable canonical✓ base firefox 116.0.2-1 2987 latest/stable/… mozilla✓ - gnome-3-38-2004 0+git.efb213a 143 latest/stable/… canonical✓ - gtk-common-themes 0.1-81-g442e511 1535 latest/stable/… canonical✓ - snapd 2.59.5 19457 latest/stable canonical✓ snapd $ sudo snap remove firefox firefox removed $ sudo add-apt-repository ppa:mozillateam/ppa PPA publishes dbgsym, you may need to include 'main/debug' component Repository: 'deb https://ppa.launchpadcontent.net/mozillateam/ppa/ubuntu/ jammy main' Adding repository. Press [ENTER] to continue or Ctrl-c to cancel. |
PPAを追加しただけでは、まだSnap版のダミーパッケージが優先されてしまいます。
|
1 2 3 |
$ apt list firefox Listing... Done firefox/jammy 1:1snap1-0ubuntu2 amd64 |
そこで、追加したPPAの優先順位を高めるために、以下の設定ファイルを新規作成します。
|
1 2 3 4 5 6 7 |
Package: firefox* Pin: release o=LP-PPA-mozillateam Pin-Priority: 501 Package: firefox* Pin: release o=Ubuntu Pin-Priority: -1 |
再び確認すると、PPA版が見えるようになったのでインストール。
|
1 2 3 4 5 6 7 8 9 10 11 12 13 14 15 16 17 18 19 |
$ apt list firefox Listing... Done firefox/jammy 117.0+build2-0ubuntu0.22.04.1~mt1 amd64 $ sudo apt update $ sudo apt install firefox The following additional packages will be installed: libdbusmenu-glib4 libdbusmenu-gtk3-4 xul-ext-ubufox Suggested packages: fonts-lyx The following NEW packages will be installed: firefox libdbusmenu-glib4 libdbusmenu-gtk3-4 xul-ext-ubufox 0 upgraded, 4 newly installed, 0 to remove and 0 not upgraded. Need to get 65.9 MB of archives. After this operation, 242 MB of additional disk space will be used. Do you want to continue? [Y/n] y $ firefox --version Mozilla Firefox 117.0 |
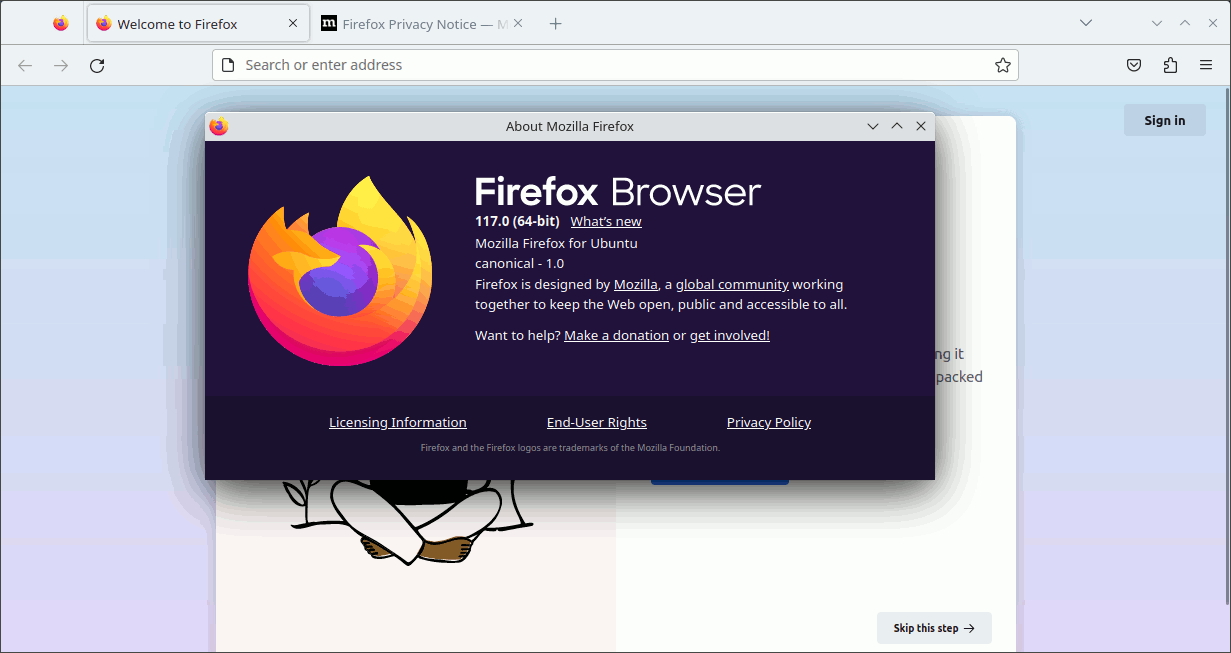
図3.PPA版Firefox
LibreOfficeをPPAからインストール
ミニマルデスクトップでセットアップしたので、オフィス系アプリは未インストール。ただし、ここで普通にインストールしようすると少し古いLibreOffice 7.3系が入ってしまいます。
|
1 2 3 4 |
$ apt list libreoffice -a libreoffice/jammy-backports 4:7.5.5-0ubuntu0.23.04.1~bpo22.04.1 amd64 libreoffice/jammy-updates,jammy-security 1:7.3.7-0ubuntu0.22.04.3 amd64 libreoffice/jammy 1:7.3.2-0ubuntu2 amd64 |
後から思うと、ここでバックポートを有効にすれば良かったとも思うのですが、これまで通りに公式レポジトリを登録してLibreOffice 7.5系をインストールしました。
|
1 2 3 4 5 6 7 8 9 10 11 12 13 14 15 16 17 18 19 20 |
$ sudo apt-add-repository ppa:libreoffice/ppa PPA publishes dbgsym, you may need to include 'main/debug' component Repository: 'deb https://ppa.launchpadcontent.net/libreoffice/ppa/ubuntu/ jammy main' Adding repository. Press [ENTER] to continue or Ctrl-c to cancel $ apt list libreoffice -a libreoffice/jammy-backports 4:7.5.5-0ubuntu0.23.04.1~bpo22.04.1 amd64 libreoffice/jammy 4:7.5.5~rc2-0ubuntu0.22.04.1~lo1 amd64 libreoffice/jammy-updates,jammy-security 1:7.3.7-0ubuntu0.22.04.3 amd64 libreoffice/jammy 1:7.3.2-0ubuntu2 amd64 $ sudo apt install libreoffice 0 upgraded, 109 newly installed, 0 to remove and 0 not upgraded. Need to get 277 MB of archives. After this operation, 1,025 MB of additional disk space will be used. Do you want to continue? [Y/n] y $ libreoffice --version LibreOffice 7.5.5.2 50(Build:2) |
digiKamをバックポートからインストール
digiKamはKDE系の画像管理ソフトで、以前よりデジカメで撮影した画像のexif情報編集に愛用しています。
KDE系のKubuntuなら、何もせずともパッケージマネージャから最新版を入れることが出来るはず、と期待するもここでもSnap版が幅を利かせていました。
|
1 2 3 4 |
$ digikam --version Command 'digikam' not found, but can be installed with: sudo snap install digikam # version 8.1.0, or sudo apt install digikam # version 4:7.5.0-3fakesync1 |
最新版はバックポートで利用可能のようなので、ここでようやくバックポートレポジトリを登録します。
|
1 2 3 4 5 |
$ sudo add-apt-repository ppa:kubuntu-ppa/backports PPA publishes dbgsym, you may need to include 'main/debug' component Repository: 'deb https://ppa.launchpadcontent.net/kubuntu-ppa/backports/ubuntu/ jammy main' Adding repository. Press [ENTER] to continue or Ctrl-c to cancel. |
バックポートを有効にしたことで他の多くのパッケージに更新が適用され、その後、digiKam現行版をインストールしました。
|
1 2 3 4 5 6 7 |
$ sudo apt install digikam Need to get 91.5 MB of archives. After this operation, 289 MB of additional disk space will be used. Do you want to continue? [Y/n] y $ apt list digikam -a digikam/jammy,now 4:8.1.0-0ubuntu1~ubuntu22.04~ppa1 amd64 [installed] digikam/jammy 4:7.5.0-3fakesync1 amd64 |
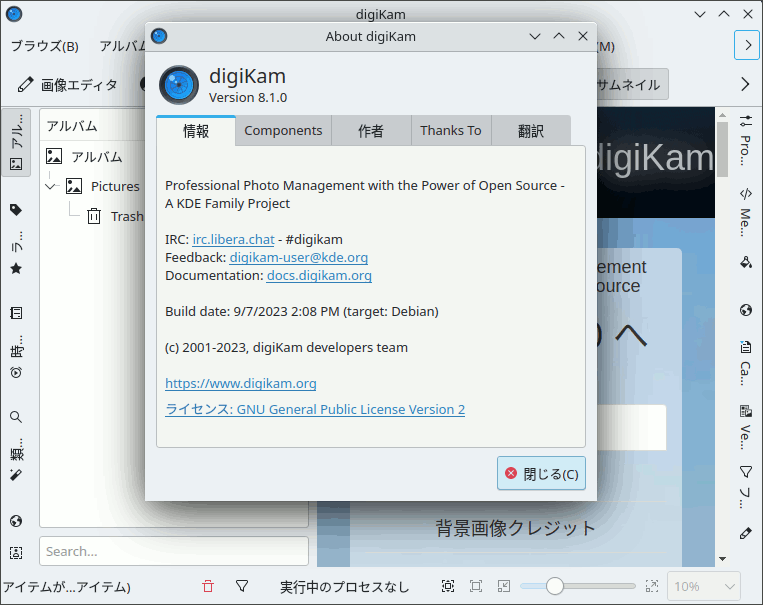
図4.digiKamバージョン情報
GIMPをインストール
画像加工ソフトの定番GIMPは、パッケージマネージャから入れてもSnap版も、バージョンは同じようです。
|
1 2 3 4 |
$ gimp Command 'gimp' not found, but can be installed with: sudo snap install gimp # version 2.10.30, or sudo apt install gimp # version 2.10.30-1build1 |
素直にパッケージマネージャからインストールしました。
|
1 2 3 4 5 6 7 |
$ sudo apt install gimp Need to get 23.2 MB of archives. After this operation, 112 MB of additional disk space will be used. Do you want to continue? [Y/n] y $ gimp --version GNU Image Manipulation Program version 2.10.30 |
Chrome PPA追加してインストール
Chromeブラウザをインストールするにはまず、公式レポジトリの公開鍵を保存します。
|
1 2 3 4 5 6 7 8 9 10 11 12 13 14 15 |
$ wget -q -O - https://dl.google.com/linux/linux_signing_key.pub | sudo gpg --dearmour -o /usr/share/keyrings/chrome-keyring.gpg $ ls -l /usr/share/keyrings/ -rw-r--r-- 1 root root 10640 Aug 29 10:10 chrome-keyring.gpg -rw-r--r-- 1 root root 2247 May 31 02:42 ubuntu-advantage-cc-eal.gpg -rw-r--r-- 1 root root 2274 May 31 02:42 ubuntu-advantage-cis.gpg -rw-r--r-- 1 root root 2236 May 31 02:42 ubuntu-advantage-esm-apps.gpg -rw-r--r-- 1 root root 2264 May 31 02:42 ubuntu-advantage-esm-infra-trusty.gpg -rw-r--r-- 1 root root 2275 May 31 02:42 ubuntu-advantage-fips.gpg -rw-r--r-- 1 root root 2250 May 31 02:42 ubuntu-advantage-realtime-kernel.gpg -rw-r--r-- 1 root root 2235 May 31 02:42 ubuntu-advantage-ros.gpg -rw-r--r-- 1 root root 7399 Sep 18 2018 ubuntu-archive-keyring.gpg -rw-r--r-- 1 root root 6713 Oct 27 2016 ubuntu-archive-removed-keys.gpg -rw-r--r-- 1 root root 3023 Mar 27 2021 ubuntu-cloudimage-keyring.gpg -rw-r--r-- 1 root root 0 Jan 17 2018 ubuntu-cloudimage-removed-keys.gpg -rw-r--r-- 1 root root 1227 May 28 2010 ubuntu-master-keyring.gpg |
そして、次のレポジトリファイルをroot権限で新規作成します。
|
1 |
deb [arch=amd64 signed-by=/usr/share/keyrings/chrome-keyring.gpg] http://dl.google.com/linux/chrome/deb/ stable main |
|
1 2 3 4 5 6 |
$ sudo nano /etc/apt/sources.list.d/google.list $ ls -l /etc/apt/sources.list.d/ -rw-r--r-- 1 root root 117 Aug 29 10:11 google.list -rw-r--r-- 1 root root 162 Aug 29 09:46 kubuntu-ppa-ubuntu-backports-jammy.list -rw-r--r-- 1 root root 150 Aug 29 09:46 libreoffice-ubuntu-ppa-jammy.list -rw-r--r-- 1 root root 150 Aug 29 09:46 mozillateam-ubuntu-ppa-jammy.list |
パッケージマネージャで更新の上、Chromeをインストールします。
|
1 2 3 4 5 6 7 |
$ sudo apt update $ sudo apt install google-chrome-stable The following NEW packages will be installed: google-chrome-stable $google-chrome --version Google Chrome 116.0.5845.110 |
Remmina PPA追加してインストール
RemminaはGNOME系のリモートデスクトップアプリです。KDE系にはKRDCという同様のアプリがあるのですが、今までRemminaを使ってきた設定(接続先情報など)をそのまま引き継ぎたかったので、Kubuntuになっても引き続き使うことにしました。
これもそのままパッケージマネージャから入れようとすると、Snap版より少し古くなってしまう模様。
|
1 2 3 4 |
$ remmina Command 'remmina' not found, but can be installed with: sudo snap install remmina # version v1.4.31, or sudo apt install remmina # version 1.4.25+dfsg-1ubuntu0.1 |
Remmina公式PPAを登録してパッケージリストを更新すると、Snap版には及びませんが少し新しいバージョンが入れられそうです。
|
1 2 3 4 5 6 7 8 9 10 11 |
$ sudo add-apt-repository ppa:remmina-ppa-team/remmina-next Repository: 'deb https://ppa.launchpadcontent.net/remmina-ppa-team/remmina-next/ubuntu/ jammy main' Adding repository. Press [ENTER] to continue or Ctrl-c to cancel. $ sudo apt update $ apt list remmina -a Listing... Done remmina/jammy 1.4.29+ppa202212201227.rfb19eb5f1.db77dd06a6~ubuntu22.04.1 amd64 remmina/jammy-updates,jammy-security 1.4.25+dfsg-1ubuntu0.1 amd64 remmina/jammy 1.4.25+dfsg-1 amd64 |
そのままパッケージマネージャからインストール。
|
1 2 3 4 5 6 7 8 9 10 |
$ sudo apt install remmina 0 upgraded, 12 newly installed, 0 to remove and 0 not upgraded. Need to get 2,443 kB of archives. After this operation, 9,490 kB of additional disk space will be used. Do you want to continue? [Y/n] $ apt list remmina -a remmina/jammy,now 1.4.29+ppa202212201227.rfb19eb5f1.db77dd06a6~ubuntu22.04.1 amd64 [installed] remmina/jammy-updates,jammy-security 1.4.25+dfsg-1ubuntu0.1 amd64 remmina/jammy 1.4.25+dfsg-1 amd64 |
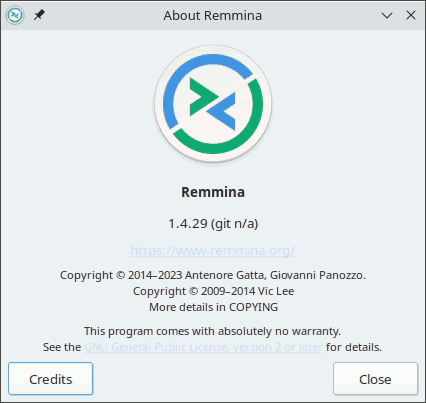
図5.Remminaバージョン情報
Remminaの設定ファイルは、 ~/.local/share/remmina/ に収められているので、新しいPCへの設定の引き継ぎをネットワーク越しに行うのであれば、scpを以下のように実行すると便利です。
|
1 |
$ scp -rp ~/.local/share/remmina USERNAME@IP_ADDRESS:~/.local/share/ |
SMPlayer PPA追加してインストール
メディアプレーヤーはミニマルデスクトップ構成でもVLCが入っていましたが、使い慣れたSMPlayerをインストールします。
このソフトも公式レポジトリを追加しないと、Snap版同等のバージョンを入れることができません。
|
1 2 3 4 5 6 7 8 9 10 11 12 13 |
$ smplayer Command 'smplayer' not found, but can be installed with: sudo snap install smplayer # version 23.6.0, or sudo apt install smplayer # version 21.10.0~ds0-1 $ sudo add-apt-repository ppa:rvm/smplayer Repository: 'deb https://ppa.launchpadcontent.net/rvm/smplayer/ubuntu/ jammy main' Adding repository. Press [ENTER] to continue or Ctrl-c to cancel. $ sudo apt update $ apt list smplayer -a smplayer/jammy 23.6.0-1~jammy1 amd64 smplayer/jammy 21.10.0~ds0-1 amd6 |
付随パッケージと共にSMPlayerをインストール。
|
1 2 3 4 5 6 7 8 |
$ sudo apt install smplayer The following NEW packages will be installed: ffmpeg libaudio2 libenca0 libvorbisidec1 mplayer python3-pycryptodome rtmpdump smplayer smplayer-skins smplayer-themes smtube youtube-dl 0 upgraded, 12 newly installed, 0 to remove and 0 not upgraded. Need to get 13.5 MB of archives. After this operation, 40.8 MB of additional disk space will be used. Do you want to continue? [Y/n] y |

図6.SMPlayerバージョン情報
Elisa Music Playerをインストール
音楽プレーヤは長らくGNOME定番のRhythmboxを使ってきましたが、特に思い入れもないので、KDE系のElisa Music Playerへ乗り換えることにします。
ただ、レポジトリが存在せず、Snap版よりは古いバージョンにはなりますが、パッケージマネージャからインストールしました。
|
1 2 3 4 5 6 |
$ elisa Command 'elisa' not found, but can be installed with: sudo snap install elisa # version 23.04.3, or sudo apt install elisa # version 21.12.3-0ubuntu1 $ sudo apt install elisa |
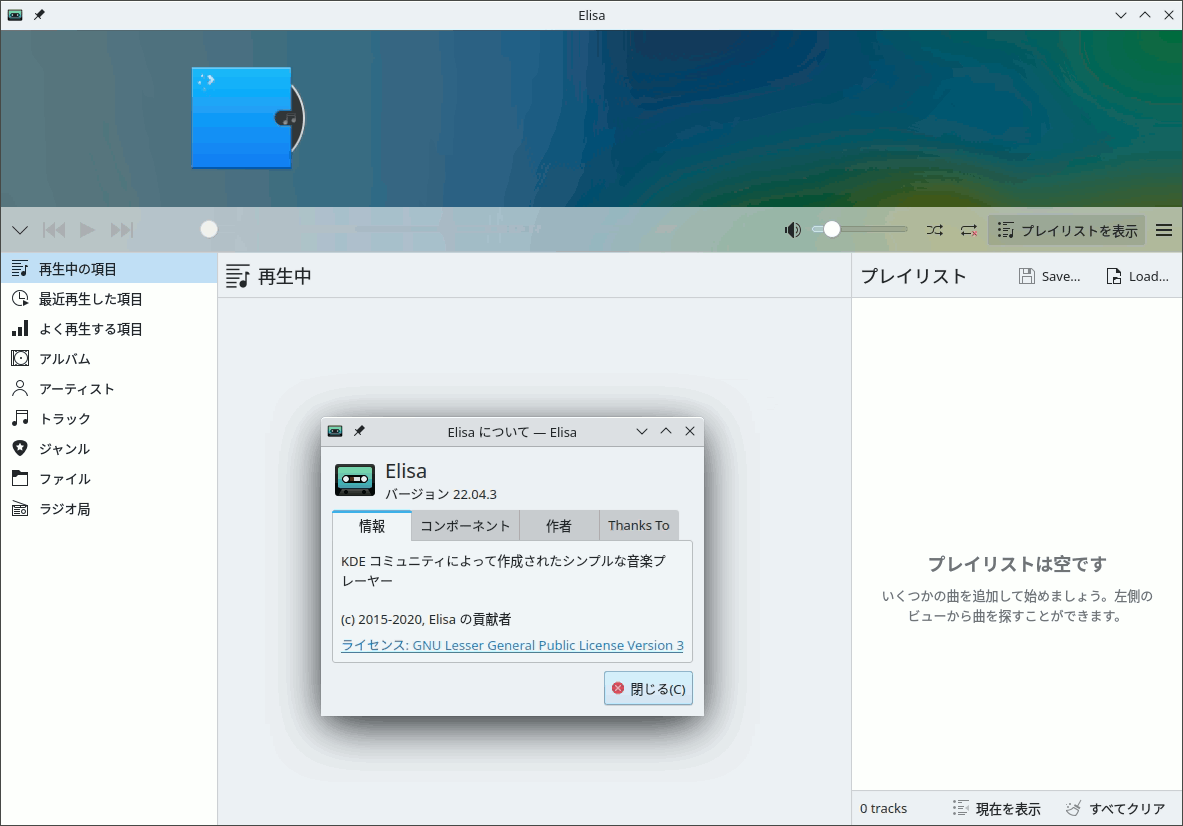
図7.Elisaバージョン情報
デフォルトPythonをPython3にする
最後によく使うであろうPythonの状況をターミナルから確認してみると、Python3は入っているがデフォルトのPythonが設定されていない様子。
|
1 2 3 4 5 6 7 |
$ python --version Command 'python' not found, did you mean: command 'python3' from deb python3 command 'python' from deb python-is-python3 $ python3 --version Python 3.10.12 |
調べた結果、python-is-python3パッケージをインストールして解決しました。
|
1 2 3 4 5 6 7 8 9 |
$ sudo apt install python-is-python3 The following NEW packages will be installed: python-is-python3 0 upgraded, 1 newly installed, 0 to remove and 0 not upgraded. Need to get 2,788 B of archives. After this operation, 13.3 kB of additional disk space will be used. $ python --version Python 3.10.12 |
