Unboundの導入
unboundパッケージをインストールします。
|
1 2 3 4 5 6 7 8 9 10 11 12 13 |
$ sudo apk add unbound (1/6) Installing dnssec-root (20190225-r2) (2/6) Installing libevent (2.1.12-r5) (3/6) Installing libexpat (2.5.0-r0) (4/6) Installing unbound-libs (1.17.0-r0) (5/6) Installing unbound (1.17.0-r0) Executing unbound-1.17.0-r0.pre-install (6/6) Installing unbound-openrc (1.17.0-r0) Executing busybox-1.35.0-r29.trigger OK: 89 MiB in 88 packages $ rc-service unbound status * status: stopped |
今回構築したいDNSサーバは、ISP謹製や公共DNS(GoogleやCloudFlareなど)へのフォワーダではなく、ルートから引っ張ってキャッシュ保持するDNSサーバで、そのサービス提供先はLAN内のネットワークデバイスに限ります。
この命題に沿って設定ファイルを記述するわけですが、インストール時にデフォルトで入っているサンプルの設定ファイルは大きすぎるので、リネームして逃がしておいてから、同じ名前で以下の内容で一から作成しました。
|
1 2 3 4 5 6 7 8 9 10 11 12 13 14 15 16 17 18 19 20 21 22 23 24 25 |
server: verbosity: 1 ## INTERFACE ADDRESS interface: 0.0.0.0 interface: ::0 do-ip4: yes # do-ip6: yes do-udp: yes do-tcp: yes do-daemonize: yes ## ACCESS CONTROL access-control: 127.0.0.1/8 allow access-control: 192.168.0.0/16 allow access-control: ::1/128 allow access-control: fd00::/8 allow access-control: fe80::/64 allow ## PROTECTION hide-identity: yes hide-version: yes ## ROOT HINT #sudo wget -S https://www.internic.net/domain/named.cache -O /etc/unbound/root.hints root-hints: "/etc/unbound/root.hints" |
必要なルートヒントを取得します。本来は定期的に更新する必要があるのですが、それはまた追々考えます。
|
1 2 3 4 5 6 7 8 9 10 11 12 13 14 15 16 17 18 19 20 21 22 23 24 25 26 27 28 |
$ sudo wget -S https://www.internic.net/domain/named.cache -O /etc/unbound/root.hints Connecting to www.internic.net (192.0.46.9:443) HTTP/1.1 200 OK Date: Wed, 18 Jan 2023 04:50:31 GMT Server: Apache Vary: Accept-Encoding Last-Modified: Tue, 17 Jan 2023 22:23:00 GMT ETag: "cf1-5f27d24747900" Accept-Ranges: bytes Content-Length: 3313 Cache-Control: max-age=420 Expires: Wed, 18 Jan 2023 04:56:10 GMT X-Frame-Options: SAMEORIGIN Referrer-Policy: origin-when-cross-origin Content-Security-Policy: upgrade-insecure-requests Age: 80 Connection: close Content-Type: text/plain; charset=UTF-8 Content-Language: en Strict-Transport-Security: max-age=48211200; preload saving to '/etc/unbound/root.hints' root.hints 100% |*************************************| 3313 0:00:00 ETA '/etc/unbound/root.hints' saved $ ls -l -rw-r--r-- 1 root root 3313 Jan 18 12:50 root.hints -rw-r--r-- 1 root root 1337 Jan 18 12:46 unbound.conf -rw-r--r-- 1 root root 50276 Oct 14 02:06 unbound.conf.sample |
サービスを開始する前に、設定ファイルを簡易チェック(あまり厳しく見てくれないので気休め程度)。
|
1 2 |
$ unbound-checkconf unbound-checkconf: no errors in /etc/unbound/unbound.conf |
サービスを開始して、自動起動も有効にします。
|
1 2 3 4 5 6 |
$ sudo rc-service unbound start * Caching service dependencies ... [ ok ] * Checking /etc/unbound/unbound.conf ... [ ok ] * Starting unbound daemon ... [ ok ] $ sudo rc-update add unbound boot * service unbound added to runlevel boot |
別の端末から dig でクエリを投げてみます。
|
1 2 3 4 5 6 7 8 9 10 11 12 13 14 15 16 17 18 19 20 21 22 23 24 25 26 27 28 |
$ dig @192.168.51.9 yahoo.co.jp ; <<>> DiG 9.11.3-1ubuntu1.18-Ubuntu <<>> @192.168.51.9 yahoo.co.jp ; (1 server found) ;; global options: +cmd ;; Got answer: ;; ->>HEADER<<- opcode: QUERY, status: NOERROR, id: 31014 ;; flags: qr rd ra; QUERY: 1, ANSWER: 8, AUTHORITY: 0, ADDITIONAL: 1 ;; OPT PSEUDOSECTION: ; EDNS: version: 0, flags:; udp: 1232 ;; QUESTION SECTION: ;yahoo.co.jp. IN A ;; ANSWER SECTION: yahoo.co.jp. 300 IN A 182.22.25.252 yahoo.co.jp. 300 IN A 182.22.28.252 yahoo.co.jp. 300 IN A 182.22.25.124 yahoo.co.jp. 300 IN A 183.79.250.123 yahoo.co.jp. 300 IN A 183.79.219.252 yahoo.co.jp. 300 IN A 183.79.217.124 yahoo.co.jp. 300 IN A 183.79.250.251 yahoo.co.jp. 300 IN A 182.22.16.251 ;; Query time: 74 msec ;; SERVER: 192.168.51.9#53(192.168.51.9) ;; WHEN: Thu Jan 19 17:15:57 HKT 2023 ;; MSG SIZE rcvd: 168 |
初回は所要時間 74msec とありますが、次回はキャッシュが有効な限り、 数msec で済みます。
クエリロギングの有効化
名前解決の問い合わせ履歴を含めたサービスのログを出力したいので、設定ファイルに以下の項目を追加します。
|
1 2 3 4 5 |
server: chroot: "" logfile: /var/log/unbound.log log-queries: yes log-time-ascii: yes |
空のログファイルを作成し、その所有権をunboundに引き当てます。
|
1 2 3 4 5 6 7 8 9 10 11 12 13 14 15 16 |
$ sudo touch /var/log/unbound.log $ sudo chown unbound:unbound /var/log/unbound.log $ ls -l /var/log -rw-r----- 1 root wheel 0 Jan 18 11:12 acpid.log drwxr-s--- 2 root wheel 4096 Jan 18 11:08 chrony -rw-r----- 1 root root 15617 Jan 18 11:12 dmesg -rw-r----- 1 root wheel 145235 Jan 18 14:35 messages -rw-r----- 1 root wheel 204825 Jan 18 13:11 messages.0 -rw-r--r-- 1 unbound unbound 0 Jan 18 14:26 unbound.log drwxr-x--- 2 root root 4096 Jan 18 11:46 vmware -rw-rw-r-- 1 root utmp 0 Jan 18 11:12 wtmp $ sudo rc-service unbound restart * WARNING: you are stopping a boot service * Stopping unbound daemon ... [ ok ] * Checking /etc/unbound/unbound.conf ... [ ok ] * Starting unbound daemon ... [ ok ] |
サービスを再起動すると、クエリの様子も含めてログに記録されるようになりました。
|
1 2 3 4 5 6 7 |
$ tail /var/log/unbound.log Jan 19 11:49:11 unbound[27045:0] info: 192.168.102.86 public-api.wordpress.com. A IN Jan 19 11:49:11 unbound[27045:0] info: 192.168.102.86 public-api.wordpress.com. A IN Jan 19 11:49:11 unbound[27045:0] info: 192.168.102.86 pixel.wp.com. A IN Jan 19 11:49:11 unbound[27045:0] info: 192.168.102.86 pixel.wp.com. A IN Jan 19 11:49:12 unbound[27045:0] info: 192.168.102.86 api.twitter.com. A IN Jan 19 11:49:12 unbound[27045:0] info: 192.168.102.86 analytics.google.com. A IN |
管理ツールunbound-controlの有効化
unbound-control はUnboundサービスの管理ツールです。次項のログローテーション処理でログファイルの再読込みに必要になるので、有効にしておきます。
利用する前にまず、こちらのガイドに従ってまずSSL証明書を作成します。
|
1 2 3 4 5 6 7 8 9 10 11 12 13 14 15 |
$ sudo unbound-control-setup setup in directory /etc/unbound Certificate request self-signature ok subject=CN = unbound-control removing artifacts Setup success. Certificates created. Enable in unbound.conf file to use $ ls -l /etc/unbound -rw-r--r-- 1 root root 3313 Jan 18 12:50 root.hints -rw-r--r-- 1 root root 1717 Jan 31 22:08 unbound.conf -rw-r--r-- 1 root root 50276 Oct 14 02:06 unbound.conf.sample -rw------- 1 root root 2484 Feb 1 09:56 unbound_control.key -rw-r----- 1 root root 1501 Feb 1 09:56 unbound_control.pem -rw------- 1 root root 2484 Feb 1 09:56 unbound_server.key -rw-r----- 1 root root 1549 Feb 1 09:56 unbound_server.pem |
Unbound設定ファイルに以下の項目を追加します。
|
1 2 3 4 5 6 7 8 9 10 11 12 13 14 15 16 17 18 19 20 21 22 23 24 |
## REMOTE CONTROL remote-control: # Enable remote control with unbound-control(8) here. # set up the keys and certificates with unbound-control-setup. control-enable: yes # what interfaces are listened to for remote control. # give 0.0.0.0 and ::0 to listen to all interfaces. control-interface: 127.0.0.1 # port number for remote control operations. #control-port: 8953 # unbound server key file. server-key-file: "/etc/unbound/unbound_server.key" # unbound server certificate file. server-cert-file: "/etc/unbound/unbound_server.pem" # unbound-control key file. control-key-file: "/etc/unbound/unbound_control.key" # unbound-control certificate file. control-cert-file: "/etc/unbound/unbound_control.pem" |
サービスを再起動すれば利用可能になります。早速、サービスサマリや統計情報を確認してみましょう。
|
1 2 3 4 5 6 7 8 9 10 11 12 13 14 15 16 17 18 19 20 21 22 23 24 25 26 27 28 29 30 31 32 33 34 35 36 37 38 39 40 41 42 43 44 45 |
$ sudo unbound-control status version: 1.17.0 verbosity: 1 threads: 1 modules: 2 [ validator iterator ] uptime: 251 seconds options: reuseport control(ssl) unbound (pid 27045) is running... $ sudo unbound-control stats thread0.num.queries=171 thread0.num.queries_ip_ratelimited=0 thread0.num.cachehits=72 thread0.num.cachemiss=99 thread0.num.prefetch=0 thread0.num.expired=0 thread0.num.recursivereplies=99 thread0.requestlist.avg=2.60606 thread0.requestlist.max=21 thread0.requestlist.overwritten=0 thread0.requestlist.exceeded=0 thread0.requestlist.current.all=0 thread0.requestlist.current.user=0 thread0.recursion.time.avg=0.411875 thread0.recursion.time.median=0.193629 thread0.tcpusage=0 total.num.queries=171 total.num.queries_ip_ratelimited=0 total.num.cachehits=72 total.num.cachemiss=99 total.num.prefetch=0 total.num.expired=0 total.num.recursivereplies=99 total.requestlist.avg=2.60606 total.requestlist.max=21 total.requestlist.overwritten=0 total.requestlist.exceeded=0 total.requestlist.current.all=0 total.requestlist.current.user=0 total.recursion.time.avg=0.411875 total.recursion.time.median=0.193629 total.tcpusage=0 time.now=1675219660.539810 time.up=263.644899 time.elapsed=263.644899 |
保持しているキャッシュのダンプ出力は、以下のように行います。
|
1 2 3 4 5 6 7 8 9 |
$ sudo unbound-control dump_cache START_RRSET_CACHE ;rrset 60 1 1 8 2 bam.nr-data.net. 60 IN CNAME bam.cell.nr-data.net. bam.nr-data.net. 60 IN RRSIG CNAME 13 3 300 20230202024414 20230131024414 31429 ... . . . (略) |
ログのローテーション設定
ログが無尽蔵に増殖しないよう、日割りログを2週間分程度保持する要領で、ログローテーションを設定しておきます。
Alpine Linuxではデフォルトでインストールされていないので、まずlogrotateパッケージのインストールから。
|
1 2 3 4 5 6 7 8 9 10 |
$ sudo apk add logrotate (1/4) Installing libacl (2.3.1-r1) (2/4) Installing popt (1.19-r0) (3/4) Installing logrotate (3.20.1-r3) (4/4) Installing logrotate-openrc (3.20.1-r3) Executing busybox-1.35.0-r29.trigger OK: 102 MiB in 103 packages $ which logrotate /usr/sbin/logrotate |
cron の daily フォルダにlogrotateの実行スクリプトが配置されました。
|
1 2 3 4 5 6 7 8 9 |
$ ls -lR /etc/periodic/ /etc/periodic/: drwxr-xr-x 2 root root 4096 Jan 18 11:08 15min drwxr-xr-x 2 root root 4096 Feb 1 11:24 daily drwxr-xr-x 2 root root 4096 Jan 18 11:08 hourly drwxr-xr-x 2 root root 4096 Jan 18 11:08 monthly drwxr-xr-x 2 root root 4096 Jan 18 11:08 weekly /etc/periodic/daily: -rwxr-xr-x 1 root root 367 Sep 15 06:48 logrotate |
次に、前項で利用可能とした unbound-control の居場所を確認。
|
1 2 |
$ which unbound-control /usr/sbin/unbound-control |
Unbound用のログローテーションを、新たに以下のように定義しました。
|
1 2 3 4 5 6 7 8 9 10 11 12 |
/var/log/unbound/unbound.log { daily rotate 14 nocompress missingok notifempty create 644 unbound unbound sharedscripts postrotate /usr/sbin/unbound-control log_reopen endscript } |
定義に問題がないか、ドライランしてみます。
|
1 2 3 4 5 6 7 8 9 10 11 12 13 14 15 16 17 18 19 |
$ sudo logrotate -dv /etc/logrotate.d/unbound WARNING: logrotate in debug mode does nothing except printing debug messages! Consider using verbose mode (-v) instead if this is not what you want. reading config file /etc/logrotate.d/unbound Reading state from file: /var/lib/logrotate.status state file /var/lib/logrotate.status does not exist Allocating hash table for state file, size 64 entries Handling 1 logs rotating pattern: /var/log/unbound.log after 1 days (14 rotations) empty log files are not rotated, old logs are removed considering log /var/log/unbound.log Creating new state Now: 2023-02-01 11:27 Last rotated at 2023-02-01 11:00 log does not need rotating (log has already been rotated) not running postrotate script, since no logs were rotated |
数日後確認してみると、設定通りに日毎のログファイルになっていました。
|
1 2 3 4 5 6 7 8 9 10 11 12 13 |
$ ls -l /var/log -rw-r----- 1 root wheel 0 Jan 18 11:12 acpid.log drwxr-s--- 2 root wheel 4096 Jan 18 11:08 chrony -rw-r----- 1 root root 15579 Jan 21 14:10 dmesg -rw-r----- 1 root wheel 175371 Feb 6 11:01 messages -rw-r----- 1 root wheel 204811 Feb 2 08:22 messages.0 -rw-r--r-- 1 unbound unbound 1698316 Feb 6 11:02 unbound.log -rw-r--r-- 1 unbound unbound 12911350 Feb 4 01:59 unbound.log-20230204 -rw-r--r-- 1 unbound unbound 2647757 Feb 5 01:59 unbound.log-20230205 -rw-r--r-- 1 unbound unbound 3501562 Feb 6 01:59 unbound.log-20230206 -rw-r--r-- 1 unbound unbound 48456346 Feb 2 08:58 unbound.log.1 drwxr-x--- 2 root root 4096 Feb 5 02:00 vmware -rw-rw-r-- 1 root utmp 0 Jan 18 11:12 wtmp |
Unbound設定チューニング
最後に仮想CPU2コア、RAM1GBと言う環境に合わせて、多少設定をチューニングしてみました。
|
1 2 3 4 5 6 7 |
server: num-threads: 2 # CPU Cores msg-cache-size: 200m rrset-cache-size: 400m # msg-cache-size x2 outgoing-range: 450 # 2 Cores num-queries-per-thread: 225 # outgoing-range / 2 (1個辺り約20kB消費) minimal-responses: yes |
unbound-control で表示されるthreads数が増えましたが、体感的にすぐ効果が現れるような事柄でもないので、しばらく様子を見てみます。
|
1 2 3 4 5 6 7 8 |
$ sudo unbound-control status version: 1.17.0 verbosity: 1 threads: 2 modules: 2 [ validator iterator ] uptime: 65 seconds options: reuseport control(ssl) unbound (pid 28329) is running... |
既存のOpenWRTルータの設定変更
出来上がったDNSサーバをネットワーク上の皆に使ってもらえるよう、DHCPサーバであるOpenWRTルータに DHCP-Option #6 を設定します( '6, 192.168.51.9' はカンマ後ろに半角スペース必須)。
|
1 2 3 4 5 6 7 |
config dhcp 'lan' option interface 'lan' option dhcpv4 'server' option start '150' option limit '50' option leasetime '2h' option dhcp_option '6, 192.168.51.9' |
DHCPサービスを再起動して設定を適用。 なお、この設定はDHCPサーバの Static Leases へ登録しているホストへも、等しく適用されていました。
|
1 |
# /etc/init.d/odhcpd restart |
LuCI上でこの設定は、 LAN Interface の中にある DHCP Server タブの Advanced Settings の中にあります。
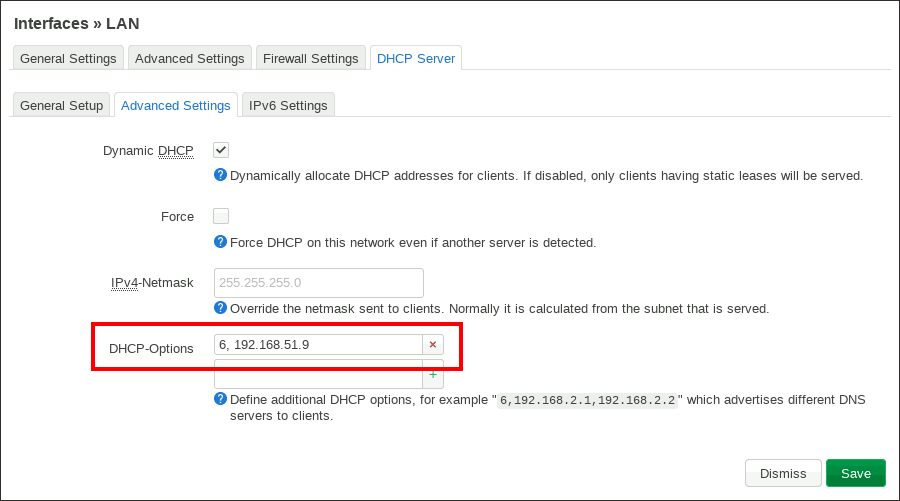
図14.OpenWRT DHCP-Options
さらにルータ上のOpenConnect VPNサーバには、VPNクライアントが使うDNSサーバを登録する設定項目があるので、こちらにも追加しておきます。
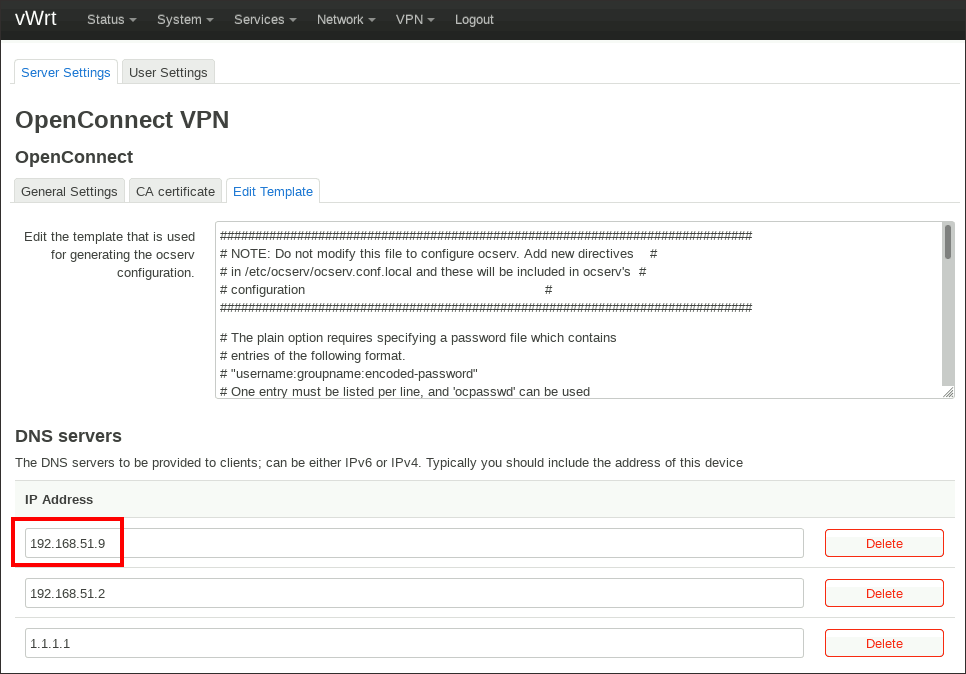
図15.OpenConnect VPN DNS Servers
ローカルゾーンのことはDHCPサーバへ問い合わせ
こうして構築したUnboundによるDNSサーバは、このままではLAN内のローカルドメイン .lan のことは何一つ分かりません。
そこで、そのようなクエリはLAN内のDHCPサーバへ問い合わせるよう、ローカルゾーンとスタブゾーンを次のように設定します。
|
1 2 3 4 5 6 7 8 9 10 11 12 |
server: ## LOCAL ZONE (ASK DHCP SERVERS) local-zone: "lan." transparent local-zone: "0.168.192.in-addr.arpa." transparent stub-zone: name: "lan." stub-addr: 192.168.51.5 stub-addr: 192.168.51.2 stub-zone: name: "0.168.192.in-addr.arpa." stub-addr: 192.168.51.5 stub-addr: 192.168.51.2 |
別のクライアントから、正常に名前解決してもらえることを確認。
|
1 2 3 4 5 6 7 8 9 10 11 12 13 14 15 16 17 18 19 20 21 |
$ dig @192.168.51.9 nas06.lan ; <<>> DiG 9.11.3-1ubuntu1.18-Ubuntu <<>> @192.168.51.9 nas06.lan ; (1 server found) ;; global options: +cmd ;; Got answer: ;; ->>HEADER<<- opcode: QUERY, status: NOERROR, id: 44683 ;; flags: qr rd ra; QUERY: 1, ANSWER: 1, AUTHORITY: 0, ADDITIONAL: 1 ;; OPT PSEUDOSECTION: ; EDNS: version: 0, flags:; udp: 1232 ;; QUESTION SECTION: ;nas06.lan. IN A ;; ANSWER SECTION: nas06.lan. 0 IN A 192.168.51.206 ;; Query time: 5 msec ;; SERVER: 192.168.51.9#53(192.168.51.9) ;; WHEN: Fri Feb 20 15:46:28 HKT 2023 ;; MSG SIZE rcvd: 54 |
Unbound設定ファイル全体像
こうして完成したUnbound設定ファイルの全体像は、次の通りです。
|
1 2 3 4 5 6 7 8 9 10 11 12 13 14 15 16 17 18 19 20 21 22 23 24 25 26 27 28 29 30 31 32 33 34 35 36 37 38 39 40 41 42 43 44 45 46 47 48 49 50 51 52 53 54 55 56 57 58 59 60 61 62 63 64 65 66 67 68 69 70 71 72 73 74 75 76 77 78 |
server: verbosity: 1 ## INTERFACE ADDRESS interface: 0.0.0.0 interface: ::0 do-ip4: yes # do-ip6: yes do-udp: yes do-tcp: yes do-daemonize: yes ## ACCESS CONTROL access-control: 127.0.0.1/8 allow access-control: 192.168.0.0/16 allow access-control: ::1/128 allow access-control: fd00::/8 allow access-control: fe80::/64 allow ## PROTECTION hide-identity: yes hide-version: yes ## OPTIMIZE num-threads: 2 # CPU Cores msg-cache-size: 200m rrset-cache-size: 400m # msg-cache-size x2 outgoing-range: 450 # 2 Cores num-queries-per-thread: 225 # outgoing-range / 2 (eats 20kB/thread) #cache-min-ttl: 3600 # default 0 minimal-responses: yes ## ROOT HINT #sudo curl -o /etc/unbound/root.hints https://www.internic.net/domain/named.cache root-hints: "/etc/unbound/root.hints" ## LOGGING # use-syslog: yes chroot: "" logfile: /var/log/unbound.log log-queries: yes log-time-ascii: yes ## LOCAL ZONE (ASK DHCP SERVERS) local-zone: "lan." transparent local-zone: "0.168.192.in-addr.arpa." transparent stub-zone: name: "lan." stub-addr: 192.168.51.5 stub-addr: 192.168.51.2 stub-zone: name: "0.168.192.in-addr.arpa." stub-addr: 192.168.51.5 stub-addr: 192.168.51.2 ## REMOTE CONTROL remote-control: # Enable remote control with unbound-control(8) here. # set up the keys and certificates with unbound-control-setup. control-enable: yes # what interfaces are listened to for remote control. # give 0.0.0.0 and ::0 to listen to all interfaces. control-interface: 127.0.0.1 # port number for remote control operations. #control-port: 8953 # unbound server key file. server-key-file: "/etc/unbound/unbound_server.key" # unbound server certificate file. server-cert-file: "/etc/unbound/unbound_server.pem" # unbound-control key file. control-key-file: "/etc/unbound/unbound_control.key" # unbound-control certificate file. control-cert-file: "/etc/unbound/unbound_control.pem" |
次回はNetdataなどのリソースモニタリングツールを使った、Unboundの仕事ぶりの可視化に取り組みたいと思います。
